
Picking up the brush is a miniatures painting series aimed at the complete beginner.
I’ll be running through all the steps required to do a reasonable job of putting paint on plastic (or metal!). I’ll be pointing out all the mistakes I made (I’ve only been painting just over a year myself!), along with all the good tips I’ve picked up. I’m by no means an expert, pretty average Joe really, but hopefully we can learn a few things together.
Right, you’ve gathered all your resources; you’ve decided on the miniatures you’re going start with; what now? Well, you could just paint it up now, and in their eagerness to get painting, many a beginner does just that. But, like many things in life, prior preparation ultimately produces better results. Depending upon what the miniature is going to be used for, will dictate the depth you should go to in order prepare the figure for painting.
If, for example, the miniature is for use in a board game, it is often acceptable to do the least amount of prep. After all, the figure isn’t usually the focus of a board game, and could often be replaced with a common meeple or pawn. It will be susceptible to a lot of handling, and is usually viewed from at least arms length, and from roughly a 45° degree angle. Also the level of painted detail is often at its lowest on a board game figure. Of course, this isn’t always the case, some people like to paint all their figures to a higher standard, and produce some great finished figures, but it takes time, and many of us just want to get on with playing the game. So with these miniatures, you’ll usually give them a quick clean up, removing any obvious blemishes, and move on to the next stage.
On the other hand, if you are painting a miniature to display, then the length you’ll go to in preparing it for paint will be far greater. You’ll want the miniature totally blemish free, as the slightest imperfection will be noticeable once paint has been applied.
Then you have somewhere in between. Miniature war-games often feature a wide range of finishes. The front ranks of troops are often painted to a higher level than those standing behind, and then there’s the ‘Boss figures’, or ‘Heroes’, which, because they stand out on the battlefield, are often painted to a very high standard.
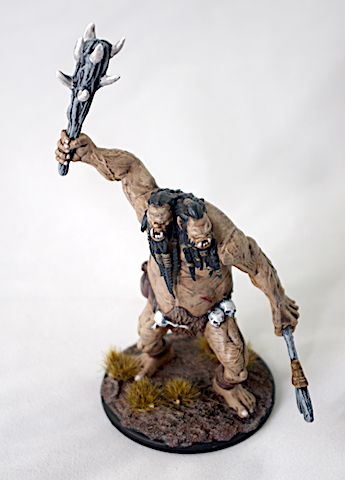
Painting miniatures at the highest level is something I aspire to, but at the moment my experience falls woefully short, and to that end, though I will touch upon some of the skills and methods required, I will be aiming at producing a finish suitable for gaming. From those figures used in board games, to those used in skirmish and war-games.
Clean up and Assembly
Depending upon the miniature you have selected to paint, there may be no assembly required; on the other hand, the assembly may be a complicated affair – War-game miniatures especially, as they often have differing armament you can select during assembly, as well as different poses available.
For a beginner, eager to get painting, a pre-assembled figure is the place to start. Board game miniatures usually fit the bill, though there are many others readily available to choose from too. I certainly wouldn’t try the more complicated assemblies as a first attempt, though some of the simpler ones should be well within the capabilities of a beginner.
If you are painting a whole troop/regiment/horde, call it what you will, of the same figure, just with variations of pose. Then it’s best to assemble and paint the figures all at the same time. This ensures they all have the same consistent finish, though if you’re unsure of the final finish, it can be worth painting a single ‘test’ piece.
Metal models
Firstly, an apology; when I came to take pictures for this section I realised that all my metal figures had already been assembled, cleaned up, and were awaiting paint! So, I’ve used plastic models to highlight some of the things to look for as the principle is the same. When I get some new metal figures, I will replace the pictures, so bear with me on that!
Metal figures will either come pre-assembled, sometimes as a single cast, or with the individual parts contained within the packaging. Some may even contain plastic parts.
Before assembly take a good look over the individual pieces. Metal miniatures are created using moulds, which come in two halves, and due to the nature of the process, there are a number of imperfections to look out for.
- Mould lines – these are caused where the two halves of the mould join, and can often been seen running all the way around the side. It isn’t too much of an issue if it occurs over an area that is highly textured, such as fur, but on smooth areas it can really stand out.
- Flashing – This occurs when the molten metal seeps between the mould halves, leaving a very thin layer of metal, and are pretty obvious when you look over the pieces.
- Vents – When the metal is poured into the mould the air need to escape, and it does this through vents. Occasionally the metal itself can enter the vent, and leave a small spike. Depending upon the figure, they can sometimes be hard to spot, and you may even think they are an intentional part of the model!
- Bubbles – Not something I’ve come across recently, but may be visible on older casts. They are caused when the molten metal is poured in, trapping air inside the mould, and appear either as a single bubble shaped hole, or a scattering of what looks like tiny pin pricks.
- Gaps – Usually found between limbs and other parts of the miniature that have been joined together.
- Distortion and damage – This can happen at any point after casting, usually caused by packaging or handling. It most commonly happens to spear shafts, and other fragile parts of the miniature.

Mould lines are removed by using a knife or file, and you have to be careful not to damage the actual figure. It’s best to run a knife blade along the mould line at 90°, so you scrape it away rather than cut it away. Trying to cut it away will often see the blade being drawn into, and cutting, the figure itself. Be careful using a file too, it can be all too easy to damage the miniature.
Top Tip
Use a Micro Mesh polishing kit after you’ve used a knife/file to get the very best finish – ideal for smooth areas, where even the slightest blemish can be seen once painted.
Flashing can be removed very easily, as the metal is very thin. You may be able to remove it by simply bending it off, or pushing it with a small file. If not, cut it away and then clean up the mould line that it will leave.

Vents can usually be removed using your nail, or by giving them a slight nudge with the end of a file. You will be left with a slight mark, which can be filed away.
Bubbles, along with gaps, will have to be filled, and we shall cover that a little later.
Distortion and damage can usually be easily rectified. If bent, a small pair of long nose pliers will usually fix the issue, just be careful not to break the part clear off. Broken pieces can be re-fixed, and depending upon size and shape, you can use glue or putty (see below).
Once you’ve cleaned the individual parts up, it’s time to see how they fit together. Offer up the parts and see how good the fit is; don’t expect it to be a perfect match, metal figures rarely are, and the pieces will, inevitably, require a little tailoring. Using a file, carefully adjust to get the best fit; any small gaps can be filled once assembled.
If the figure is on a rail that slots into the base, check how well it fits. If it’s too loose, put a small kink in the rail, that should hold it.
Once your happy with the fit, it’s time to assemble the miniature. There are a few different techniques that can be used to do this, pinning, gluing, bonding with putty, and one that is becoming popular amongst war-gamers, magnetising! Pinning is an ideal solution for large pieces, and involves drilling a small hole into the two pieces to be joined, and inserting a ‘pin’ into one side. The pieces are then pushed together, with a small amount of glue, and the resultant bond is extremely strong.
Magnetising sees very small (as small as 1/16 of an inch diameter!) magnets placed in the limbs and torso to join them together. The magnets are neodymium iron boron, also known as rare earth magnets, and are very strong for their size. This is great for war-gamers who wish to change the armament of their troops/vehicles from battle to battle.
The main one we shall be concentrating on though, is gluing. For metal figures, or metal to plastic, superglue is required.
Top Tip
There are two forms in which you can buy superglue, a gel and a liquid. Both have their pro’s and con’s, and it can be useful to purchase both.
Liquid superglue flows a lot better, and can be applied very thinly, giving it a faster drying time. It does have a habit of going everywhere though.
Gel, is great for those awkward pieces, as it tends to stay where it’s put. But, it can be difficult to apply in a thin layer, thus increasing drying time, and causing it to ooze out the sides when you push the pieces together. It’s also prone to taking an age to come out of the bottle!
Make sure you know exactly how you want the pieces to fit together, and apply a very thin layer of glue to one surface. Then hold the pieces together for a short time, until a ‘fix’ is made, then carefully place to one side, and leave to fully set.
Larger pieces can be held whilst setting using a variety of things, Blu-Tac being a common one. If the pieces just will not bond, or the initial fit isn’t great, then you can use a small amount of modelling putty instead of glue. This has the advantage of filling any gaps that would have been caused by poor fit, and can be filed to shape if you put too much on.
The modelling putty comes in a strip, yellow (filler) on one side, and blue (hardener) on the other. You just cut off the amount you need, and mix it into a green ball. You can then use it to join the two pieces together, removing any excess that spills over.
Top Tip
When using putty to join two pieces, place the putty on one side, and a very small amount of superglue on the other. The resultant bond will be very strong.
Plastic models
The majority, but not all, of plastic miniatures that require assembly, come on a sprue. A sprue is the channel through which plastic is poured when making the miniatures. This solidifies, joining all the small parts together. Hence, when you get self-assembly miniatures, they come affixed to a ‘sprue’.

It’s worth mentioning here that there is quite a variety in the quality and types of plastic used, and then there are also resin miniatures to consider. The plastic figures often seen in board games are moulded in one piece. These are usually the softer plastics, as they are easier to remove from the mould, and they don’t hold the detail that harder plastics do. Quality, hard plastic, figures, such as those by Games Workshop, usually require assembly, but they are highly detailed and easier to clean up.
Resin figures are becoming more popular, and are usually (in my experience) produced as a single figure. They are extremely well detailed, but are delicate, and bring other issues with them, as I will mention.
The more complex miniatures come with a set of assembly instructions, make sure you read through them before you start removing pieces from the sprue! Some will have different build options, so make up your mind what you want at this point. The pieces should be identified on the sprue, so you know which piece is which.
Removing pieces from the sprue is a simple matter of using clippers/snips, or a knife; just ensure you don’t cut too close to the actual piece you’re removing, it’s easy enough to clean it up later, rather than trying to deal with the damage caused by the clippers! Keep all the pieces in a tray; you don’t want to lose them at this point!
You can, at this point, take a look over the individual pieces, looking for imperfections. You can then clean up the individual pieces, or, and it really depends upon the miniature you’re putting together, assemble it first.
With plastic miniatures, I usually assemble them dry first (no glue), and there are a lot of miniatures around now that are supposed to be ‘glue free’, but I personally, would rather not take the chance of it falling apart once painted. By doing a dry fit, I am sure of how it all goes together, and that everything fits how I want it. There’s nothing worse than getting halfway through assembly, to find you should have placed something between the torso, only you’ve already glued it together!
Before we go into assembly, let’s look at what imperfections you can expect on plastic models.
- Mould lines – These are caused in the same manner as on metal figures, though it varies dramatically depending upon manufacturer.
- Flashing – You don’t see this anywhere near as often as you used to on plastic models, but it does occur, usually around such parts as fingers and hands.
- Scars – These are the marks left when cutting the piece from a sprue, though they can sometimes be left over from the manufacturing process too.
- Gaps – Very common on pre-assembled models, occurring where the parts are joined together.
- Distortion and damage – As with metal models, it will usually be weapons, limbs, and other extremities that will see the most of the distortion.

Mould lines and flashing are removed using the same process as you would with metal figures, only even more care needs to be taken so as not to damage the figure itself. Many board game figures can be very soft plastic, and often have a lot of imperfections, sometimes it’s best to just clean up the worst culprits!

Note – If you have to file or scrape resin models, be aware that the dust is toxic if breathed in, and a mask should be worn.
Top Tip
For both metal, and plastic figures, if your looking for the very best finish, cover the model in a very thin layer of white primer (to be discussed in part IV) before cleaning up, this will really highlight any imperfections, especially mould lines.
Distortion can usually be dealt with by giving the figure the ‘hot water’ treatment. Plastic has a memory, and it ‘remembers’ how it used to be when it was first removed from the mould. When it becomes warped or distorted, it’s like it has taken a bump on the head, and has forgotten how it used to be. What we need to do is remind it!

Take your warped or distorted piece, and place the area that has warped (or indeed, the whole model) either in a bowl of hot water, or under the running hot water tap. The hotter the water, the more malleable the plastic will become – be careful though, too hot will turn the plastic to mush! Health and safety at work now – don’t burn your fingers! Hold it in the water for a count of 5, and you should see the piece return to its original form. If not, it can at this point, be positioned to how you want it. Once you’re happy, plunge the figure into cold water (the colder the better) and leave to cool. When you remove it, it should have taken on its original (unless you positioned it otherwise) form. This process can be repeated until you get the desired result.

Now to assemble the piece, as I said, you can do this before cleaning the model up. After checking everything fits together, and quality plastic figures tend to be a much better fit than metal (due to using steel moulds), the parts need to be glued.
The type of glue required to join plastic is a polystyrene cement. This tends to come in three different forms – Thick, which comes in a tube, not unlike a small toothpaste tube, and should be avoided for miniatures (unless it’s a very large miniature!); Medium viscosity cement, this is the one I’ve been using, and is a good all-rounder, ideal for the beginner; Liquid poly cement, which is very thin and comes in a bottle with a brush. It dries extremely quickly, and you have little time to make adjustments when joining pieces.

Polystyrene cement of all types, works by melting the plastic together, and forms a very strong bond. There is a downside to this though; if you inadvertently get it on parts you shouldn’t, it will melt it, and it destroys surface detail very quickly. An advantage of using liquid poly – it dries that quick, it is less likely to cause serious damage.
Note – Polystyrene cement will not glue resin, use superglue!
Plastic figures are very easy to modify, moving limbs around, changing weapons, and even heads! But, as this is aimed at the beginner, I’m not going to cover it now, maybe in a later post?
Depending upon how the miniature fits to the base, both metal and plastic, you can do this now. Figures that come on a rail can be glued in using the appropriate glue, unless of course, you intend to customise the way the figure stands. Again, as a beginner I wouldn’t aim to do this on your first few models. However, a lot of figures do not use the rail method, and require gluing to the base by the bottoms of their feet (paws, claws, or even bottom!). You can do this now, aiming to fit it permanently, or, by using a very slight amount of superglue (not poly), you can make it a temporary fit. You can glue your model to another medium altogether, just so the model can be painted.
The advantage of a temporary fit is that you may decide to customise the base once it’s painted – for example, including rocks to raise the figure up – then the model can be easily removed to do this. Again, I’d say get a few simpler ones under your belt first.
Post Assembly
Gap Filling
Once you’ve mounted your model on its base, it’s time to fill any gaps. This can, of course, be carried out before you fit the base, especially to any awkward areas; you just need to be aware, there may be some gaps to fill where the figure fits to the base. This is nearly always the case with ‘rail fit’ figure, though depending on how you’ll be finishing the base, you may not need to fill the gaps.

Common gaps tend to be small, crack like, gaps, usually found where the limbs or head fit to the torso. Of course, you can find them just about anywhere, and on occasion you may even find large chunks missing, especially on old metal figures that have been poorly cast.
There are two substances generally used for gap filling – modelling putty, commonly referred to as ‘Green Stuff’ or Kneadatite, and plastic putty.
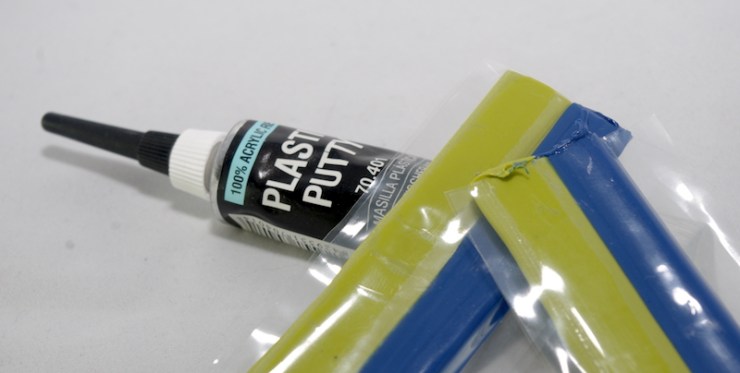
Green Stuff/Kneadatite
This usually comes in the form of a ribbon, one side yellow, and one side blue. The yellow side is the ‘filler’, and the blue is the ‘hardener. Mixing the two together produces a green putty, hence ‘Green Stuff’!
Once mixed you are supposed to have around 1 1/2 hours working time, I have always found it’s more like 20 minutes though! It should be cured in about 5 hours, and reach maximum hardness in 24.
To use, simply cut off the required amount, and roll together until a nice even colour has been achieved; there should be no streaks. Next, to fill a small, crack like gap, roll the ball out into a sausage of a thickness in proportion to the gap.
Using an appropriate tool, Modellers tool, dentist tool, small screwdriver, or even a cocktail stick – push the putty into the gap, ensuring that it fully fills it.
Removing any excess can be tricky, as it’s easy to pull the putty back out of the gap. So, trim back, leaving the gap over-filled, leave the putty to cure, and file it back then.
For larger areas, use a blob of putty just bigger than the gap you need to fill, and press it firmly in. Again, trim, leave to cure, and file back.
The putty can easily be detailed using a variety of tools; indeed, it’s often used to sculpt new parts, or even entire models! The detailing can be put in before it’s fully cured, and this is preferable if blending it to its surrounding area, simply use the tip of knife to blend and shape the putty.
Top Tip
If you lightly dampen your tools, they shouldn’t stick to the putty, but avoid getting any water into the gap – otherwise the putty won’t stick to this either!
To obtain a nice smooth finish on the putty, slightly damp your finger and run it over the putty, it should smooth out nicely, but be aware, the putty will hold the fingerprints of dry fingers!
Plastic Putty
I use Vallejo Plastic Putty, which comes in a tube, and is liquid in consistency. This is ideal for filling small gaps, and saves having to cut and roll ‘Green Stuff’. It’s basically water-based marble dust, which sets hard, and can be sculpted and painted.
I use this all the time with small gaps, you don’t get any waste, and it’s quick and easy(ish) to use. The long tip of the tube makes it easy to apply, and it tends to run into the gap; it can be smoothed nicely with a damp finger, or a cotton bud, and it can also be brushed over with an old dry brush, which will push it nicely into the gap and remove the excess.
Using plastic putty can leave things looking very messy; it can leave a white, paint like, residue all around the area you’ve filled, especially if you’ve brushed over it. Though this looks unsightly, if you’ve brushed off the excess, it should not be noticeable once primed.
It’s also very good at filling small holes left by bubbles in the cast. Apply a little to the area, and using your finger, wipe across the pitted area. The putty will fill the holes, and you just have to remove any excess with a damp paper towel or cotton bud.
It does have its limitations – though it dries quite quickly, it does take a long time to reach its full hardness, and even then, can be difficult to file back. I’ve also heard a lot of complaints about it falling out of the gap once set, due to it apparently not sticking to plastic. I have never come across this myself, but I do only use it on the smallest of gaps.
If you do use it to fill larger gaps then your better off layering it up. Apply a layer to the area, leave it to cure, then apply another layer, and repeat until the gap is filled. Personally, I’d use ‘Green Stuff’!

Finally
All of this take practise – removing mould lines isn’t as easy as you think it should be, and to begin with, you’ll often end up removing half the model, or still being able to see the line once painted. Gap filling also takes time to master, but keep trying and you’ll get there – at least that’s the principal I’m working on!
One thing I have to keep reminding myself is – ‘What am I going to be using this miniature for?’ – I still keep falling foul of this. There’s no need to put all your time and energy into trying to make a relatively low quality board game figure, into a work of art. For what they will be used for, a little care and attention is all that is required. People will notice your nice paint job, but then they’ll be concentrating on the game, and the figures will be hardly noticed again!
So, now we have our model in front of us. It’s been assembled, all the mould lines and such like have been removed, and the gaps have been filled, let’s slap some paint on!
Not quite… There are a few more steps to go through before you start adding colour to your model – You will need to prime it, but more importantly, you will need to think about it!
Before then though, there’s one last step I always carry out… Cleaning!
Grab an old toothbrush, or use the wife’s (only kidding), and fill a bowl with luke warm water, add a little washing-up liquid (basically a degreasant). Use the toothbrush to gently scrub the model, rinse it off with cold water, and then place it on a piece of kitchen towel to dry. Job done!
This is important, as it removes any grease from the model, usually introduced by touching it, and any other impurities that me be left over from the casting process, all of which would stop the primer sticking to it.
Well, that’s it for this instalment of ‘Picking up the Brush’. Next time I’ll be looking at priming, a bit of colour theory, and thinking about the final result!
Don’t forget, if you have any questions on what I’ve written, advice or criticism, or you want to share some of your own experiences – then please leave your comments below.
Image Gallery


