
Picking up the brush is a miniatures painting series aimed at the complete beginner.
I’ll be running through all the steps required to do a reasonable job of putting paint on plastic (or metal!). I’ll be pointing out all the mistakes I made (I’ve only been painting just over a year myself), along with all the good tips I’ve picked up. I’m by no means an expert, pretty average Joe really, but hopefully we can learn a few things together.
Varnishing and basing – should be a doddle, yes? Well, one of them is pretty straight forward depending upon your desired result, the other though, can be a right royal pain in the … Varnishing, I’m looking at you!
Varnishing
So, why varnish? For starters, it’s not a necessity. If you’re painting something for display, which isn’t going to be handled, then there is no reason to apply varnish other than for creating a desired effect – to make something look glossy, a large eye for instance. If, however, you are painting miniatures to be used in tabletop games, then in all likelihood you’re going to want to protect them.
Acrylic paint can easily chip away or, with constant handling, start to show signs of wear. Applying a protective layer of varnish over the paint helps to prevent this from happening.
The most popular type of varnish finish is Matt, as this gives a more pleasing, realistic finish (MHO). Gloss has its uses though, and I use it to highlight jewels and such like. Gloss does give a harder finish than Matt, so if you want particularly durable miniatures, but with a matt finish, apply a Gloss varnish first and then a coat of Matt. There is of course Satin varnish, which is somewhere between the two.

Reading up on the types of varnishes people use on their miniatures is quite eye opening. There’s an amazing array of what people swear by – Wood varnish, automotive lacquers, general hobby varnish, even PVA glue! And of course, there is a good selection of varnishes designed specifically for miniatures and models painted with acrylic paint. Find what works for you and stick to it; varnish can be a temperamental thing, and what works for one person in their environment, may not work for the next!
Application
There are three ways of applying varnish – Spray can, Airbrush, and brush. I personally avoid spray cans, I just don’t like using them, and I rely on a good old brush. I can’t comment on using an Airbrush as I’ve yet to try one, hopefully that will change pretty soon, but I would imagine it gives the best results if applied correctly.
Before applying a varnish make sure the paint is totally dry and nice and clean. Ideally give it 24hrs to ensure everything is dry, and if it’s been sitting in the open for a while awaiting varnish, give it a brush over with a clean brush, or blast air over it with an airbrush, to remove any settled dust.
Next, and this is where people get caught out, read the instructions! It’s amazing how people moan about something not doing what it should, but when you get right down to it, it’s because they haven’t used it as it’s supposed to be used! Even then, it’s often best to refer to the manufacturers Website for detailed instructions, as there is limit on what can be written on the side of a small pot.
Varnishes, especially matt ones, should be shaken or stirred before use, but this introduces another problem, namely air. Once you’ve given the bottle a good shake, put some on a palette and allow it to settle for a short time – you shouldn’t be able to see any tiny air bubbles within the liquid.
The varnish should then be applied in several thin layers (unless the instructions say otherwise), with each layer allowed to dry before the next applied. Vallejo recommends 5-10 minutes between coats. Avoid touching the miniature until the varnish is dry, otherwise you will leave fingerprints!
Top Tip
If you get air bubbles appear in the varnish during application, gently blow over them until they have dispersed!
Finally, sit back and admire your finished article, oh, hang on, there’s something not quite right…
Applying a varnish should be simple, and if you’re one of the lucky ones, it probably will be. But there are a few issues that can crop up, especially when using Matt varnish, as we shall see.
Matt Varnish
Matt varnish is made up of pumice suspended in a resin, and it is the pumice that gives it the matt finish by refracting the light. This liquid suspension is what causes all the problems…
- The finish isn’t clear – this is usually caused by too much pumice in the applied layer of varnish, and causes the finish to be misty.
- The finish is Glossy instead of Matt – This is a common complaint with Matt varnishes, one I battle with myself, and is an indication of not enough pumice within the applied layer of varnish.
As you can see, applying Matt varnish correctly, with just the right pumice to resin ratio, is a skill only known to venerable monks on top of tall mountains! There are a few measures that can be taken though, to ensure you’re not too far away from getting it just so.
- Matt varnish needs to be used correctly right from the start, as soon as you open the bottle, otherwise the ratio of pumice to resin contained within goes out of the correct proportions, giving you either a glossy or a misty finish.
- Store your varnish at room temperature – if Matt varnish is stored at too cold a temperature it becomes very difficult to mix correctly.
- Make sure you mix the solution fully; there shouldn’t be a sludge in the bottom of the bottle. Either shake until mixed, or if this isn’t working, try and give it a good stir.
- Apply several thin layers of varnish, allowing the manufacturer’s recommended time between coats. Just like paint, it’s far better to apply several thin layers than one thick one.
- Don’t try going over bits you’ve missed before the coat is dry, this will leave brushstrokes in the drying layer – most varnishes dry very quickly.
That’s about all I have for varnishing. I’ve found it to be a lot of trial and error, and no matter what I do, Matt varnish always ends up erring towards a Satin finish, something that research suggests to be the norm!
Basing
Basing a miniature really finishes it off, adding impact and giving the figure a sense of ‘setting’. There are many different looks and styles you can give a base, and they can be as simple as adding a little paint, or as involving as building the entire base from putty.

One of the first things you should think about before basing your miniature is context, especially if it is going to be used within a game. If the miniatures you are painting are to be used in a game, then ideally they should all be based in the same manner. A game that takes place within a mansion would look odd if all the figures have wilderness bases!
I fell foul of this myself, and it was a lesson well learned. When setting out to paint the mini’s for Temple of Elemental Evil, it was the first time I’d painted anything for a board game, and the first batch of miniatures I painted are all based totally different – some have sandy finishes whilst others have muddy brown ones or gravel! I just got carried away experimenting, don’t forget I’m just a beginner myself, and I wanted to see what they’d look like with all these different basing materials I’d obtained.
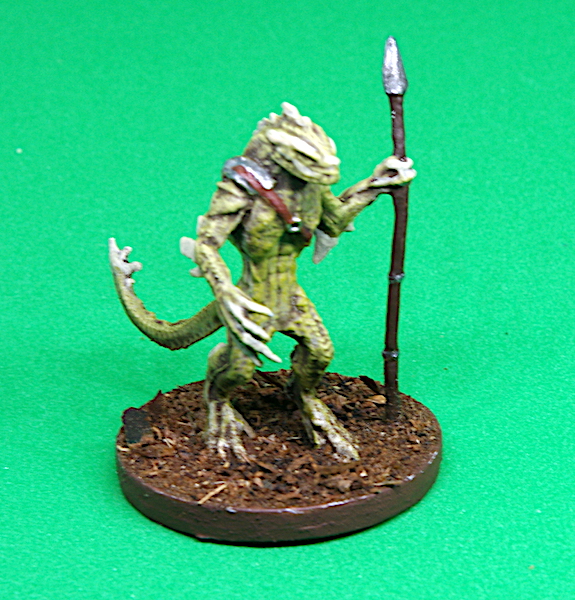
Another thing you need to think about is how much time and effort you want to put in, and is it actually worth it for the particular miniatures you’re painting. In general, boardgame figures only need simple bases, except maybe if they’re a boss monster, or something that really becomes the centre of attention within the game. The majority of wargaming figures are the same, though you’ll probably want your special units or hero’s to stand out from your core units, so give them little more attention.
Some people apply their basing medium before they prime the figure, I always do mine after the I’ve finished painting it – I don’t see any issues either way and comes it comes down to personal preference.
There are many different mediums that can be used for giving the base a textured and realistic finish…
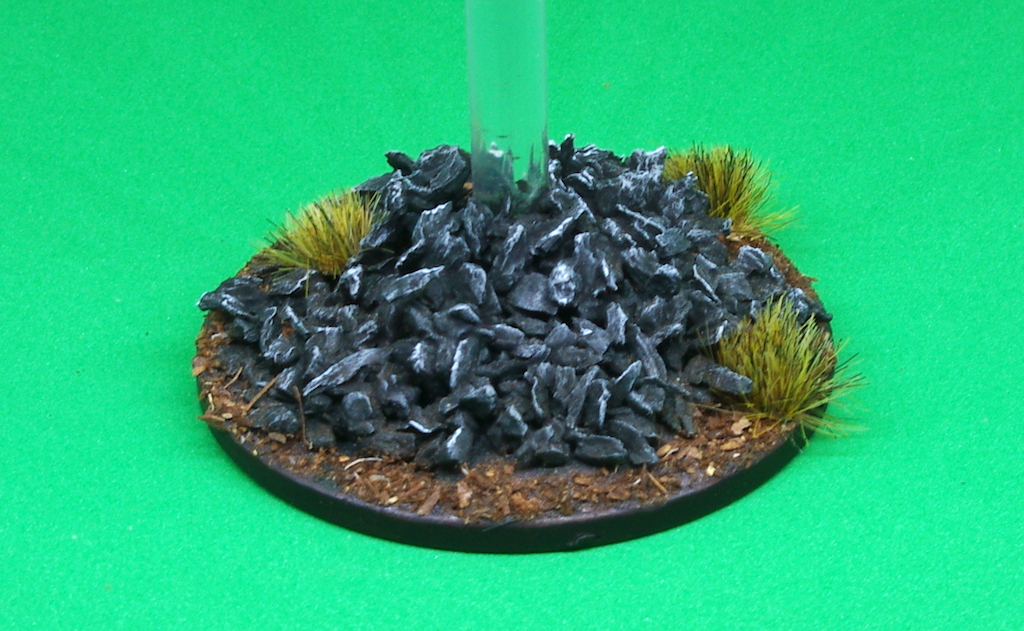
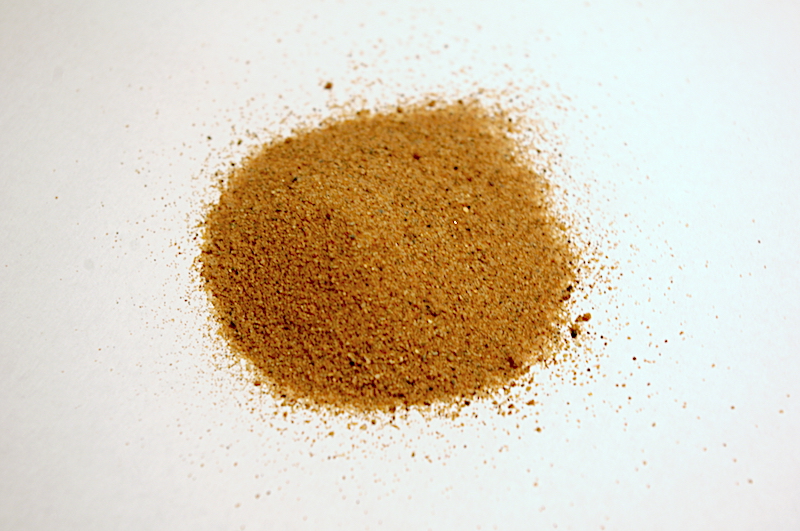
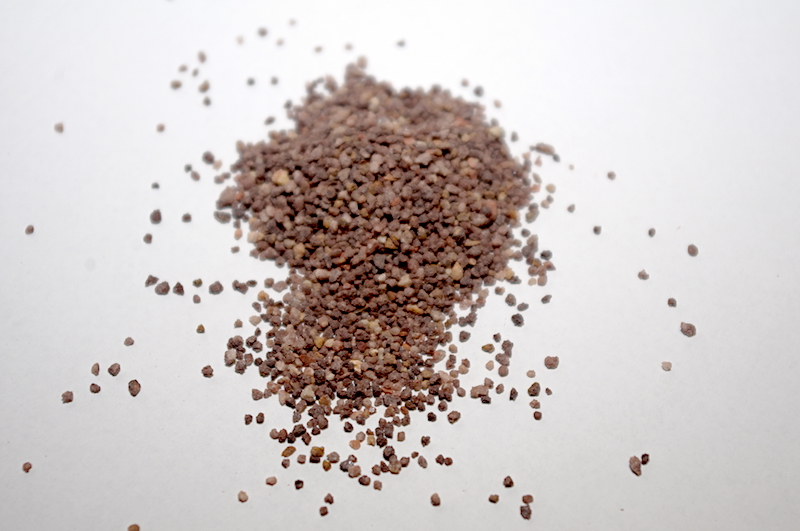
- Sand. Commonly used and readably available, it can be used to produce a variety of effects – sand (obviously), gravel, mud, soil, and even snow! It is best to obtain a variety of different grain sizes to produce a range of finishes. Mixing them together often produces the most realistic look.
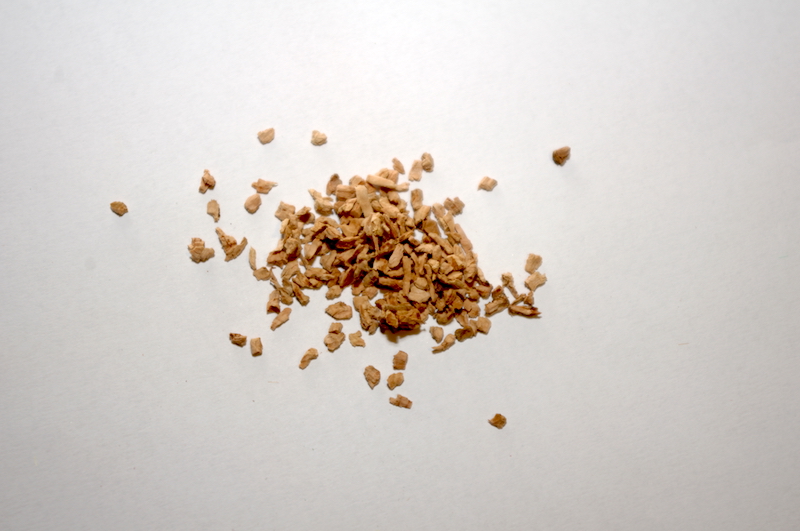
- Cork. This can be purchased pre-cut into small (approx. 2-3mm) pieces, which make really good rocks, or you can cut it yourself to whatever shape you chose.
- Grit/Gravel. Similar to sand but slightly larger is size and is used in the same manner.
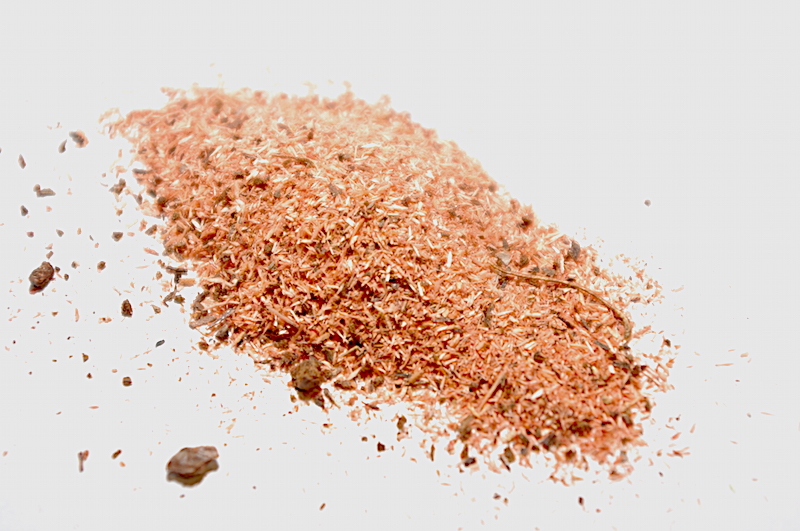
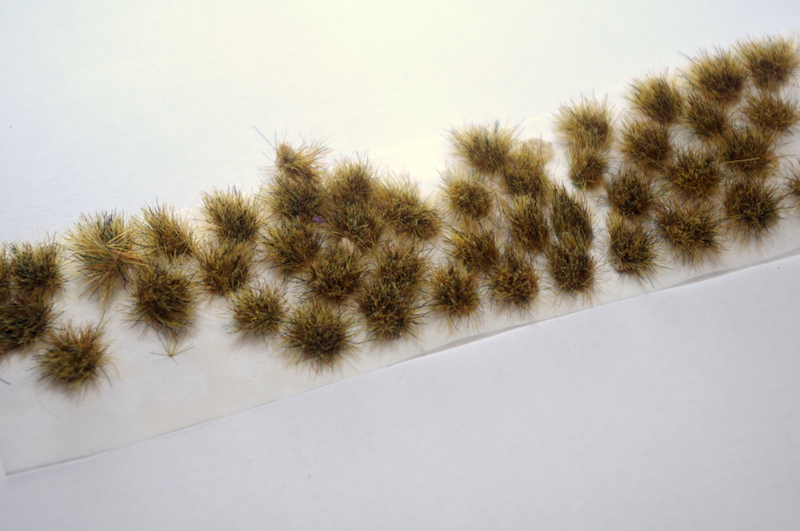
…And so much more. There is a multitude of materials that have been manufactured to replicate just about every surface you could possibly wish to cover a base with – Undergrowth, Lichen, forest ground cover, rubble, snow – all are readably available online (see the images at the end of this post for examples), and of course there is static grass.
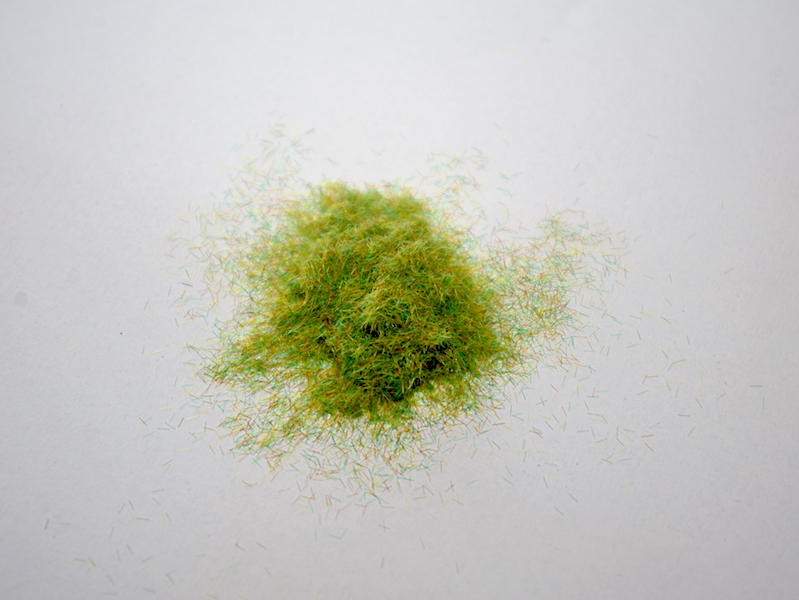
Static grass is made up of small coloured fibres that have had a static charge applied to them. When glued to a surface the static charge causes them to stand upright, giving a pleasing representation of grass… well, most of the time anyway!
Applying these mediums is pretty straightforward. You coat the area of the base that you wish to cover with PVA glue (some people recommend a water/PVA mix, I use it neat), and dip the whole base into a tub filled with the required medium. Remove your miniature and leave to dry before giving it a gentle tap to remove any loose excess. If required, repeat the process to touch up any missed areas of to thicken the layer you already have.
Some mediums don’t stick too well using PVA. If you find things are a little loose you can apply a layer of PVA over the top of the medium, and that should hold it in place. You can also do this to sand to give it a finer appearance once painted.
Superglue can be used to secure larger pieces, slate for example, when building up larger bases. Another method is to use modeller’s putty, such as Green Stuff, to create your own textured base, or to build it up and then cover it with a medium.

Once dry you can paint them up as you wish, of course, some natural looking mediums are fine left as they are, and this is a great way to cover lots of miniatures quickly, especially when you have lots of troop units in a war-game. Drybrushing is a great technique for most of the mediums, and the Internet provides a vast playground in which to find ideas.

Static grass, grass tufts (a small gathering of grass glued to a small sticky pad), lichen, moss, and such like are added right at the end, again using PVA. When using static grass it’s best if you don’t apply it to the whole base, it tends to look a bit odd if you do (I did it, and it just doesn’t look natural!). I found it best to apply it in small patches to give a more realistic look; the rule of three’s tends to give the most pleasing results.
However you decide to base your miniatures, have fun experimenting. Take a good look at other peoples work for inspiration – copying is the biggest form of flattery – and then sit back and admire your work, because that’s another one finished!
Talking of finished… That’s the last in my Picking Up the Brush series, and hopefully I’ve managed to impart the tiny bit of knowledge I’ve gleaned over the last years and a bit of painting. I’m still a beginner, there’s so much out there yet to learn, but I will keep the painting posts coming, because it’s good to share!


Nice write up! I like the matte varnishes the best. But I’ve always had trouble with brush on types. Could never get them thin and even enough for my tastes
LikeLike
Yeah, I can’t wait to get an airbrush!
LikeLiked by 1 person