
The forces of Evil surged forward, their cavalry causing mayhem in the Holy ranks, but the charge was desperately pushed back in all directions, and once more Mount Zion stood strong.
With its cavalry in disarray, the Leviathan advanced, again laying siege to the Mountain. This time the attack was successful, the Holy ranks decimated, only the Lamb of God survived, and that had been forced to concede the position.
The huge beast advanced, following up its success, its three powerful jaws snapping at anything that moved.
The Lamb winced, it was all alone, wounded and vulnerable, it held its breath as the huge beast realised its foe was there for the taking. With a ground-shaking roar the creature advanced again, its powerful jaws snapping at its pitiful prey.
“Baaa!” Went the lamb, and halted the mighty Leviathan in its tracks!
Commentary from actual game play – The Leviathan scenario from the Apocalypse expansion.

- Designer: Pascal Bernard
- Publisher: Mythic Games
- Year Released: 2019
- Players: 2-4 (increased to 6 with Legendary Battles)
- Playing Time: 45-90 minutes
- Ages: 14+
- Recommended Retail Price: Retail version price TBA
Time of Legends: Joan of Arc is billed as, ‘a narrative miniatures board game of dark fantasy and historical action.’ Set during the Hundred Years War, the game calls upon both factual and mythical history, with players controlling real life characters, such as The Black Prince, King Philippe VI de Valois, and, of course, Joan of Arc herself, or even mythical beasts like the Tarasque and the Archangel Gabriel!
At the time of writing the retail version is yet to be released (fall 2019?), and when it is, it will be a cut down version of the Kickstarter Core and Reliquary sets, which this review is based upon – please bear that in mind if looking to purchase the retail version, as some of the things mentioned here may not be relevant, especially component content.
I’ll be covering the expansions, Apocalypse and Legendary Battles, in a later post.
What’s in the box?
This is a listing of everything included within the core and reliquary boxes combined, and includes the replacement items sent out in wave 2.
- Rule book
- 2 Scenario books
- 2 Player Aids
- Battle board
- 4 Triple hex tiles
- 4 Double hex tiles
- 15 Single hex tiles
- The Beast unit board
- 4 Player boards
- 2 Influence trackers
- 2 decal sheets
- 3 Gigantic dice
- Doom die
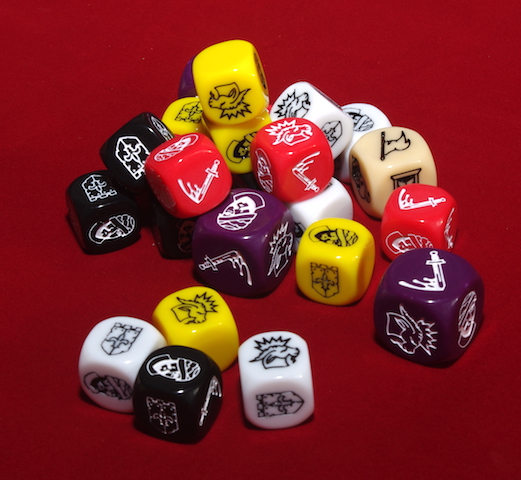
- 5 White combat dice
- 5 Yellow combat dice
- 5 Red combat dice
- 5 Black combat dice
- 20 Activation Order cubes
- 12 Charge Order cubes
- 12 Reactivation Order cubes
- 12 Interrupt Order cubes
- 27 Equipment cards
- 52 Legend cards
- 36 War Council cards
- 20 Round cards
- 6 Numbered Round cards
- 77 Troop cards
- 102 Character cards
- 17 Intrigue cards
- 54 Discussion cards
- 5 Werewolf cards
- 12 AI cards
- First Player token
- 30 Legend tokens
- 30 XP tokens
- 20 Intrigue tokens
- 26 Wound tokens
- 17 Rally point tokens
- 10 Barricade tokens
- 10 Fire tokens
- 10 Damage tokens
- 6 Reroll tokens
- 79 Scenario tokens
- 4 Building overlays
- 2 Swamp tokens
- 80 Coloured base rings (Blue/Red /White/Black)
- 17 Two slot bases
- 44 Three slot bases
- 428 Minis (Including scenery)
Read my unboxing post HERE
How does it play?
If you’re familiar with how the game plays, then feel free to interrupt, and advance to, ‘So, what do I think?’
This is going to be a very brief overview of the game; it would take far too long to go into every detail.
There are two main ways to play the game: either pick a scenario or select your army from an army list and play, ‘Battle mode.’
We’ll concentrate on playing a scenario.
The players will select a scenario to play and gather the required forces as indicated – miniatures, troop and character cards, etc.
The scenario set-up also indicates what type, and how many, round cards are used, which legend cards to use, intrigue cards, starting resources, civilians or other units, and a whole host of special rules, including victory conditions and rewards. There will also be a map showing how to set-up the battlefield and where to place the units.
Other than this, players will each require a player board, on which they will place their order cubes, legend tokens and XP tokens, as they gain them.

The battle board is placed besides the battlefield, and has on it the shuffled round cards, placed face down, and the shuffled War council deck, also placed face down. From the war council deck three cards are drawn and placed in the available slots face up – this forms the ‘river’.

A round is broken down into 4 phases – Council phase, First player’s turn, Second player’s turn, camp phase.
During the council phase the top card of the round deck is revealed and each player takes the indicated number of activation order cubes. Then 3 war council cards are drawn and placed in the available slots to form the ‘river’. Starting with the first player, each player chooses one of the war council cards from the river and applies its effects; players may choose the same card.

Also during the council phase, if a player has a character upgraded to level 2, then they may pay 1 XP for this character to remain at this level; otherwise it reverts back to level 1. Each upgraded character requires 1 XP to remain upgraded.
The first player then takes their turn by issuing orders.
To issue an order the player takes an order cube and places it within an area they wish to activate.
There are four different types of order cube:
- Activation order – these grey cubes, when placed in an area, enable each unit in that area to be activated once.
- Charge order – these grey cubes, when placed in an area, enable each unit in that area to be activated once, and also enables any units that have the charge skill to perform the charge action.
- Reactivation order – these yellow cubes can be placed in an area that already contains an order, thus activating it again.
- Interrupt order – these blue cubes can be played during the oppositions turn, between their activations, and are used in the same manner as a standard activation order.

Charge, reactivation, and interrupt orders can also be played as a standard activation order.
An area is classed as an entire hex, or, if the hex is subdivided, a division of that hex. A whole hex can accommodate 8 spaces (8 size points); a hex divided into 2 areas can hold 6 spaces per area (6 size points); a hex divided into 3 areas can contain 4 spaces per area (4 size points) – with a standard unit or character taking 1 space.

Once an order has been placed in an area, then all units within that area can perform a single action, with some units also able to perform bonus actions.
Move – Normally, a unit can only move to an adjacent, free or allied area, in which it would not raise the area’s capacity above its maximum.
Attack – The player must declare which area is to be the target of the attack, either an adjacent area (melee), or one within range (shooting). The attacker then designates which units are carrying out the attack (each area can only be attacked once per activation), and add their attack dice to the attack roll. All units in the defending area add their dice to the defence roll.
Once dice have been rolled, any effects of unit skills/powers are applied to the results, and remaining blank results are then discarded. For each shield result rolled by the defender, the defender may discard one of the attackers results.
If any attack results remain, then the defender allocates each one to a defending unit in the following order; Kill, disrupt, and push. For each kill result a unit suffers 1 wound (most troop units only have a single hit point and are therefor destroyed). A unit allocated a disrupt, if they have only 1 hit point left, is moved to the infirmary on the battle board; otherwise they take 1 wound. A push result means that the unit has been pushed back, and the attacker chooses an adjacent free or enemy area, into which the unit must move. If it cannot move then it suffers a disrupt result instead. A unit with multiple hit points may wish to take a wound instead of being pushed back.
Some units gain retaliation, either through a skill or by means of the terrain they occupy, and can apply kill, disrupt, or push results obtained by that units defence roll to the attackers units – this only applies to melee attacks.
If the area that was the subject of a melee attack is now empty, then the attacker may move some, or all, of the attacking units into that area – this is called following up.
Recruit civilian – moving a unit into an area containing a civilian, the player may elect to recruit that civilian. Taking the unit card corresponding to the civilian, it is now considered a unit belonging to that player. If the civilian is left/moved into an area on its own, it then reverts back to being a neutral civilian.
Bonus actions, can be carried out by some characters, and may be performed either at the start or the end of that characters activation. Theses actions include; discussion with certain units, such as the civilian and guide; command, where a character can activate, free of charge, a number of units within a certain range; a character can use any equipment they may be in possession of; a character can be upgraded, by paying the cost in Xp tokens.

Many units also have special skills available to them, such as the haste (able to move a greater distance), carrier (a flying unit able to pick up and transport a character), or prayer (player gains either a legend or an Xp token). These skills are not bonus actions and take the place of the unit’s single activation action.

There are also two player actions available:
Play a legend card – a player can play a legend card by paying the cost in legend tokens, as indicated on the card, the card also states when the card can be played and its effect.
Trigger an intrigue – Most scenarios include intrigue cards, which are different for the opposing sides. The player pays the cost in intrigue tokens, as indicated on the card, of the action they wish to take. The tokens are placed on the card showing that action has been taken, and cannot be take again. Intrigue tokens are usually gained by using the discussion bonus action.

A player does not have to use all of his order cubes, but must use at least one, and may carry them over to their next turn. There is, however, a limit on the number of order cubes that can be carried over, three of each type of order.
The second player then takes their turn in the same manner.
Once both players have completed their turns the camp phase is carried out:
Casualty check – all units in the waiting area of the battle board’s infirmary are rallied, and return to the board at the appropriate rally point. All other units in the infirmary have the doom die rolled for them, with the following results being applied: Death – the unit is destroyed, Disrupted – the unit remains in the disrupted section of the infirmary, Rally – the unit is rallied straight to an appropriate rally point, Delayed Rally – the unit is moved to the waiting section of the infirmary.
Fire damage – if there are fire tokens present on the board then those areas take damage (units take 1 wound, trees etc. are destroyed).
Endgame and victory check – check to see if any of the scenario’s victory conditions have been met, and if the round deck is empty then the game ends here.
Hopefully this has given the basic gist of the game. There are many other intricacies; the scenarios introduce many special rules solely for use in that scenario. The game also features flying units, which can take to the skies using the sky tiles, and gigantic units that take up a whole hex. Gigantic units can use a special attack, the gigantic attack, which targets everything in a single hex (rather than an area), with dice been distributed amongst the hexes areas and includes a trample attack that automatically pushes everything contained the area (no defence roll!).
So, what do I think?
Components
Firstly, the box is huge, and as this is the Kickstarter version, there are two of them!
The artwork on the core box I really liked; atmospheric and eye-catching, with Joan of Arc reaching out from the throng of soldiers, and, nicely blended into the background, an angel doing battle with a flying demon.
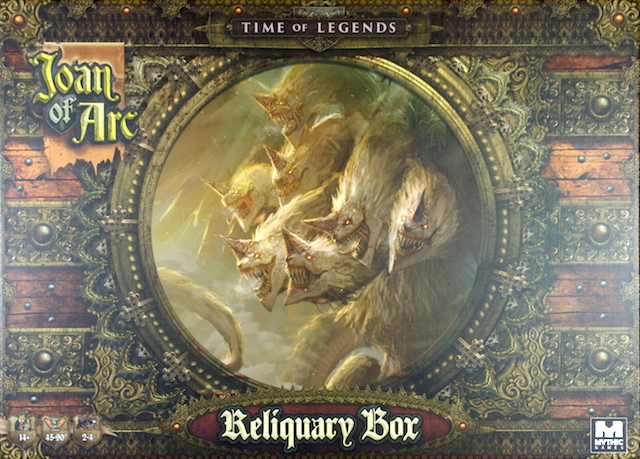
The Reliquary box, by contrast, is a little dull with the beast’s many heads on a fairly mundane background. The sides of the box, however, bring a little more character to things – in more ways than one! (Characters from the game are nicely rendered around the box edge.)
Both boxes were linen finished and of a good solid construction.
Inside the box everything is was packaged, and the miniature mostly contained within plastic trays, which in turn, were housed within another cardboard box.

The miniatures, on the whole, were very nicely detailed, especially considering the 15mm scale. The larger miniatures, greater than human size, were a fairly brittle plastic, whilst the smaller, human sized minis were of a soft plastic, and so there was a bit of bending here and there, but this is easily rectified.
The standard of sculpting, I thought, was very good throughout, with a few that really stood out – Mehmed the conqueror being my favourite, but also The Great Reaper, The Archangel Gabriel, and the Werewolf, caught my eye.

The largest of the miniatures would require the most work in terms of prep for painting, as there are plenty of gaps to fill and mould lines to remove.
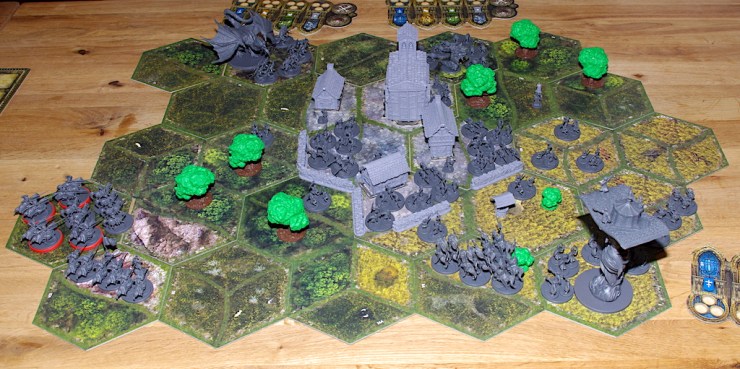
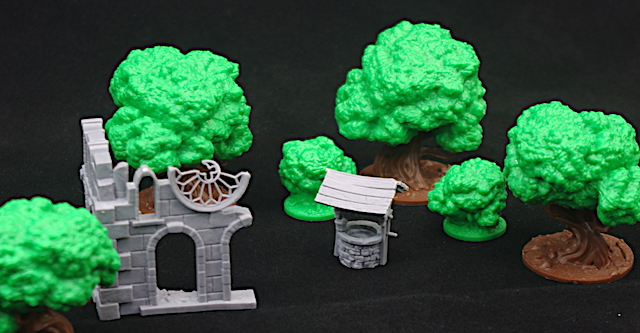
The scenery was a nice addition; the trees and bushes being the only items made from coloured plastic, but the church and houses were the stand out items. Nicely, and yet simply detailed, they certainly increased the thematic feel and look of the game when on the board.

The unit miniatures fit into bases, 2 cavalry units to a base, or 3 infantry units, but there was some variance in the tolerance of fit. Some fitted nice and snug, whilst others were very loose indeed, and ideally they needed to be stuck in. Here in lies a problem, there aren’t enough bases to have all the units based up permanently, which combined with the fact that some miniatures are used as infantry units and occasionally as single character units, meant that I had to resort to Blu-Tac to hold them in place. This also attributes to another problem, set-up time, which I will cover shortly.

There were some clip on coloured base rings, which were used to show ownership of certain units – to be honest we rarely used them. If there had been enough to put one on every unit, then I may have used them to distinguish between opposing forces, but there weren’t, so I didn’t!
All of the cardboard tokens, player boards, and hex tiles were of good, thick, high-density grey board. The tokens were pretty obvious in what they represented, once I managed to remember which was the Legend token and which was the Intrigue one!
I did find issue with the hexes, though, they weren’t big enough! The areas that are a third of a hex can contain 4 spaces, which is basically 4 units, but there is really only enough room for 3, so it’s all bit of a squeeze, especially on a crowded battlefield.
We often lost track of which units were in which area when things started to get busy. I understand the reason why the smallest areas have to hold 4 units, it’s to make moving large numbers of troops more difficult, but it is an issue. (A whole, single area hex can only hold 8, so you have to plan things carefully when moving from one are to another.)
Making the hexes bigger, though, wouldn’t cause issues elsewhere, as the maps would be too big to fit on anything but the largest of tables, and even then only at a push, so it’s something we’ll just have to live with. Maybe re-mounting the units onto rectangular bases would help?
The player boards hold the order cubes, legend and Xp tokens; no issues there, and the battle board holds the round and war council cards, the later forming the river. The infirmary section got filled up pretty quickly, and in some scenarios it becomes an overcrowded mess, but it was easy enough to divide up what was waiting and what was disrupted.
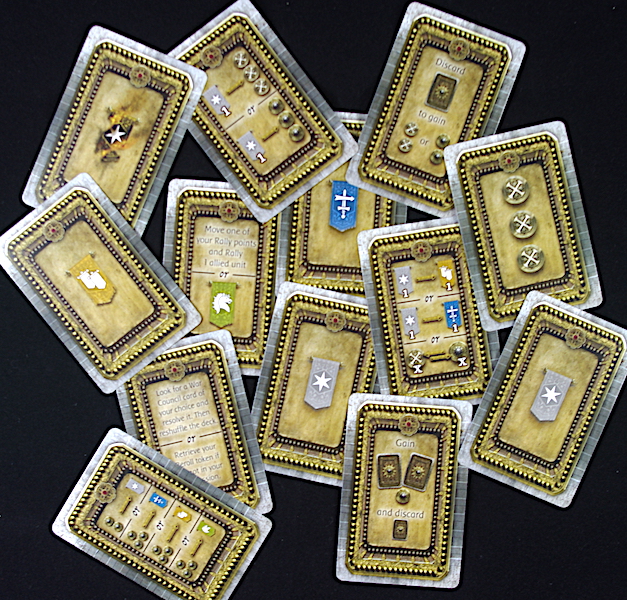
The cards were all gloss finished, and of a good quality. The text was a good size and easy to read, and the icons were straightforward to understand. It was made clear what dice were used for attack and defence, by keeping them on opposing sides of the card, and skills were clearly identified at the top of the text box.
The artwork on the cards varied from average to good, such as Henry V’s character card, which I though was very atmospheric. The image on the card related to which miniature was to be used to represent it. This led to some searching, as there are a lot of miniatures, and some times it wasn’t quite obvious which should be used.
The dice were of reasonably good quality, though there were woefully insufficient in numbers (ha, ha!), you really need at least another 2 sets to avoid constantly swapping dice around when attacking or defending in large numbers. I did like the gigantic attack dice, and there were enough of these included; they’re larger than standard and have a nice weight about them that gave a sense of satisfaction when rolling them to crush an opponent’s force.
The order cube are made of wood and were found to be a little on the light side, which I originally though would cause a few issues, but to be honest, their placement isn’t critical, so if you do send them flying with a good bang of the table, it’s easy enough to tell remember where they were.
Rules
The rulebook was 35 pages long and contained lots of pictures, plenty of examples, and was written in a fairly large text. On the whole I found it easy to understand and easy to refer to whilst playing.

The problems began, though, when I got started on the scenarios. Firstly, I would have preferred to see a list of required components at the start of each scenario, because it was easy to miss something whilst gathering everything together for the set-up, a long enough process as it is!
Secondly, the special rules really needed expanding on. Things just weren’t very clear in meaning or intent, and even after consulting BGG we had to house rule some of it. This wasn’t helped by a fair amount of errors, for instance incorrect map layout, the majority of which has been addressed, and is available to download from the Mythic Website.
The problem is that every scenario seems to introduce completely new rule variations, but doesn’t offer a complete explanation of how it should be implemented. So every time you play a new scenario your having to learn new rules, new rules that aren’t particularly clear, and this slows everything down and spoils the initial enjoyment.
Just about every scenario we played we repeated at least once straight after, trying to nail down the rules and iron out the errors, eventually you can just get on with playing the game.
Theme
When first starting to play Joan of Arc, I went through several peaks and troughs as far as theme was concerned.
Firstly, I read through the rulebook, and, having started my gaming life playing historical war-games, I was disappointed that the tactical side gave no grounds for such things as flank or rear attacks, or unit formation, and initially thought that it would scupper the realism of the gameplay for me.
But then I read through the scenario books and really felt enthused to play the historical ones; to play the part of the Black Prince or Joan of Arc. There was a short paragraph at the start of each scenario giving the background and setting the scene.
Moving on to playing my first game I found I lost that enthusiasm, as I felt that tactically, the game was unbalanced and it was too obvious on which tactics would prove decisive – this killed the theme for me, but…
I played it again, and again, different scenarios, different sides, and before I knew it I was engrossed in the stories that were unfolding before me. Tactically, as I shall go into later, the game isn’t as simple as it first appear, and the stories grow from out of the gameplay; the heroic charges, which, when beaten back re-group to try, and try again. The character, standing alone, making an heroic last stand to win the game.
The theme doesn’t just come from the player’s imagination, though, but from the scenarios themselves, many of which place you straight in the middle of some plot or another. This is especially true of the mythical scenarios – The Hanged Wolf’s cross sees one player taking on the roll of a werewolf, hidden from view by the use of scenario tokens, whilst the other player try to hunt them down. The Child has the Unholy player chasing a blessed virgin, who is looking for a safe place to give birth to the Saviour.
There are also the discussion cards, which weren’t my favourite part of the game, as I felt they actually detracted from the flow of the game, but others quite liked them, as they added to the story, if a little disjointedly – the questions and answers often didn’t really fit the scenario.

So, whether playing a mythical, story driven scenario or recreating an historically famous battle, the theme is both immersive and highly enjoyable… once you’ve nailed down the scenario rules, that is!
Gameplay
Okay, let’s start with the games few big bugbears.
The first was the scenario rules, and as I’ve already mentioned these I’m not going to go into them again here.
The second is the game set-up. Unless you’ve come up with a pretty nifty storage solution, then the game takes an age to set-up.
Some scenarios have in excess of 50 units and characters, so you have to trawl through the boxes of miniatures, trying to identify which figure represents which unit, and then you have to base them, find the unit and character cards, and any tokens specified by the scenario.
You then have to put together the map, place the scenery where required, and, of course, all the units need to go somewhere.
All of this takes time, and our first big scenario, Bloodthirst, took 2 hours to set-up. I’ve since grouped things together differently in the boxes, but I still rarely get set-up in less than an hour.
Once you’ve managed to get past this and actually play the game for the first time, you’ll find that the core rules actually flow quite nicely.
Placing cubes to activate areas is a fast and simple way to give orders to your troops. Movement is easy, as it’s often limited to advancing just one area, but attacking and defending does add a little more complexity, as some units may have to have their dice rolled separately because they have special skills, such as retaliation or dodge, but applying the results of the dice rolls is fairly straight forward.
During your first few games you’ll probably find that some rules slip through your fingers; the most notable one we kept missing was the characters command action, which is a powerful action to be missing, but it never impacted on our enjoyment of the game.
You’ll also think the game fairly simple in tactics until you’ve played a few games, thinking that gathering large forces together (clumping) is the obvious way forward for both attack and defence, but it won’t take you long to see this has its drawbacks.
The terrain plays an important part in tactics, or more precisely the breakdown of the hexes does. When forming a defensive position it pays to keep in mind the capacity of the hexes around your forces. Going from whole hexes to ones divided up can slow the opposition down if they’re trying to move a large force against you.

The division of hexes is probably the most important thing to be aware of when it comes to tactics, as they dictate how you you’ll have to move units, the amount of units you can bring into an attack, and the amount of units susceptible to a single attack.
The other thing that I found to play a major part in strategy was the round cards, which decide how many activation cubes you’ll receive at the start of the round.
At the start of the game you’ll be aware of which cards are contained in the round deck, so you’ll know what the chances of a given card turning up are, and can use this to plan ahead, at least a little. Having the card giving the most orders coming out first can play right into the hands of a player in an aggressive position, but cubes can be held back by those willing to bide their time.
I found a game was often decided during the last rounds, and having access to more orders than the opposing player at this stage, can be what wins you the game.
Knowing your units, and how to get the best from them will take some time, as they are quite varied in their skills, but this is all part of the fun. Missile troops are split into direct and arcing shot units, and when strategically placed on a hill to increase their range, can create havoc in the opposing forces, especially pushing them back and disrupting their cohesion. Whilst some units work better in defence rather than attack, and how you group them together can make a huge difference.
That leads to another important aspect – knowing the dice! White, yellow, black and red, but which is the best? Well, they each have their advantages, and knowing what they are will help to field the right units, in the right place, against the right opposition.
So, hopefully I’ve displayed that the game is tactical, and the main elements of the gameplay – orders, terrain, unit types, and the dice, all give you plenty to think about, and combine really well to offer different strategies. This was my biggest fear, that it would be too narrow in gameplay, that there would be certain tactics that would be unbeatable, but so far I haven’t come across anything like that.
Clumping was something that hit the forums, but using the terrain and units to best advantage can easily put paid to this strategy, though it does have its uses.
I initially didn’t like the way flying units were handled, but it grew on me as I discovered how to implement them correctly. I like the separate sky terrain, which really gives the game that extra dimension.
On one hand they enable you to move across the board very quickly, or to shoot down at a specific target, but on the other you become the target of every ranged unit in the oppositions forces. You can try hit-and-run tactics, but you can’t land and take off, or vice versa, on the same turn, which stops this tactic from being overpowering. I really enjoyed using the flying abilities in the end, and it opened up a whole new world of possibilities.
Anyway, moving on to other aspects of the game play, and I’ll start with the river.
Three war council cards get drawn each round, and then the players get to choose one, each may choose the same card. These range from gaining a specific order cube, to trading cubes/tokens in for different cubes/tokens, and many other things besides.
I don’t know if we were just unlucky, but nearly every round saw the players choose the same card, and this usually saw us gaining orders. If there was a card offering a free order, and the first player took it, it was deemed too much of an advantage for everyone else not to gain one too. This is something I feel needs exploring further, especially when there’s the option to gain legend cards and/or tokens in the river at the same time.
The legend cards, I though were pretty good, and added an extra layer to the game. Holding a few of these in your hand can increase your options, and some of them are pretty powerful. This is mitigated by the fact that they’re not always easy to come by, and neither are the legend tokens required to pay for them; it tends to vary from game to game.

Some games can see plenty of legend cards becoming available through the river, as well as the tokens to with them, others may see none at all. If you have a unit with the prayer skill, which enables you to gain legend tokens, then choosing to gain legend cards from the river can be a wise and game winning option.
Unit skills are quite varied, and it takes a number of games to become fully conversant with them. Some are only of use in certain circumstances, whilst others are a boon, especially the retaliation skill, which I felt was slightly overpowered.
Retaliation enables the defending unit to apply any kill, disrupt or push results it rolled; the attacker cannot use shield results to cancel these results. It certainly made us think twice about when to attack units with this skill, and it often resulted in more damage being done to the attacker than the defender.
One of my favourite mechanisms was the follow on action, which an attacker can do if they clear the area they were attacking; they move some of their units into the now vacant area. Then they can then activate this area; maybe to attack again, and maybe this leads to another follow on… This way a lot of ground can be gained, punching a hole through the defences of the opposition, but beware of spreading yourself too thinly, and of course, watch out for the interrupt!
Interrupt orders are hard to come by, but worth their weight in gold. Used at the right time they can cause all sorts of problems to an over eager aggressor, especially if you get to push them back into all different areas, ready to pick them off on your next turn. These also break up the, ‘my go, your go,’ turn structure, which otherwise would feel a little restricted, maybe even dated, when compared to a more conventional war/skirmish game.
The reactivation order is my next favourite, and again, these are worth holding onto until just the right time. It can be very tempting to use them straight away, and maybe get two attacks in from the same area, but I found they’re best used when your back is up against the wall and the enemy is starting to overwhelm you; a reactivation here, especially with a group of bowmen, can wreck havoc amongst heavily grouped units – it gives one a warm sense of satisfaction to disperse an enemies units all over the board, and then pick them off singularly, whilst they have limited defence.
Charge orders, on the other hand, I found were the hardest to instigate to best effect. A move followed by an attack, all for one order; timed right this is an excellent attack, but the temptation to try and clump your units before the charge can prove too much, and the terrain is then often your downfall!
This mix of orders is very well balanced, and using the river to trade an activation order for one of the others is the best way to obtain the more precious ones, but this often leaves you with too few order cubes to do anything meaningful, often causing you to use the newly gained order prematurely, or even use it as a standard activation order. Frustrating, but in a good way!
Balance and scaling
The game plays up to 4-players, with the division of forces varying from every player for themselves, to players in teams controlling an army each.
Most scenarios tend to be playable with a variable player count, for example: If a scenario states for 2-4 players, at 4-players the format is most likely to be 2-players on each side, each controlling a separate army, and each having different objectives. If only 2 players are playing, then players control both the armies on their side.
The system works well, and opens the majority of scenarios up to multiple players, rather than creating scenarios for a specific player count.
I found that the majority of scenarios I played were reasonably well balanced, with the exception of ‘Bloodthirst’, which, after several plays, finished with the same result every time – a victory for Mehmed. We did have a lot of fun playing it though, and I believe it is possible to win with one of the other forces, it’s just a little unbalanced.
With a little experience under the belt, though, it’s easy enough to adjust the balance when needed, for example if playing against someone new to the game. Taking away a unit works quite well, as does allowing a new player to take an extra order on the first round – it’s a very easy game to tinker with in that sense.
Replayability
No doubt about it, there’s tons of replayability contained within these huge boxes. The scenarios offer a lot more than you may think, as every playthrough turns out differently, mainly down to the river and round cards turning giving you different options every time, but also there is a breadth of tactical choices on offer, and always something new to try.
And then there’s the Battle Mode. Choose your own armies from the army list, put together a battlefield, and off you go; the possibilities are endless.
Ah, I feel a but coming on…
Yes, there’s that set-up! I found we played the same scenario several times once it was set-up, and then it would go back in the box for a few weeks, until I felt I could commit the time to getting everything together for another bout, and of course, having to fathom out a another set of special rules when playing a new scenario; it all drags you down.
So, you’ll need commitment and a handy storage solution, but the game is willing to give you a different experience every time.
Fun?
Well, we certainly had plenty of fun, at least once we got past the set-up and the scenario rules issue, and we created some great stories together.
There a definite sense of competitiveness as well; you really want to win, and things can get serious at times, as you stare at the board with no idea how to prevent what you know is about to happen!
The turn structure, ‘I go, you go,’ can be frustrating at times, as you do feel like a spectator, and unless you can get your hands on an interrupt order, there’s nothing you can do about it.
On the whole, though, we’ve had fun every time we’ve played, even when on the losing side.
Can I play it… all on my own?
Contained within the scenario book there is, ‘No more room in Hell,’ which is a solo scenario, and I’m yet to play it!
I have others wanting to play this game with me, and so, if I’m going to take the time setting it up, then it’s going to be to play with others, not on my own.
That said, occasionally, after we’ve finished a game, I have gone on to play that scenario solo, playing both sides, and it is a good way to test things out, see how you could have done things differently. But, other than that, I really wouldn’t recommend buying this to play mostly solo; you need to bring it to life by adding people!
Recommended?
I spent some time debating whom this game would most appeal to. Maybe wargamers, wanting to move into board games? Or, what about the other way around?
I think it would be easier to state who it’s not going to appeal to!
It certainly isn’t a family game, one that can be set up on the family dining table after Christmas lunch, lol. In fact, when playing certain scenarios, you’d be lucky to fit it on anything but the largest dining table, especially if playing at maximum player count.
It isn’t going to appeal to the pure Euro-gamer either, or for that matter the gamer who likes a purely story driven experience.
It will call out to the person who likes to think on the fly, as the best-made plans certainly fall apart quickly in this game. You have to be able to see the advantages the terrain can give you, and how to get the best from your units or spot a weakness in the oppositions. And, it helps if you can think quickly, because analysis paralysis can set in with so much to assimilate.
But the biggest thing to think about, before taking the plunge and buying Joan of Arc, is the set-up. Now, I don’t know what it will be like for the retail version, but if it’s anything like this one, then it will take a commitment to get it to the table regularly, especially as gathering the forces together often takes longer than playing the game!
On that note, I found most games lasted around the 60-90 minute mark, and I would say it’s suitable for ages 12+; my daughter, who’s thirteen, loves the game, and so far she’s up on wins against me, though she always wants to play the unholy side for some reason!
Ideally, I would say find someone who has it, let them set it all up and figure out the scenario rules, and then get them to teach you, it may take you by surprise!
One year on – read my thoughts HERE
Extras
Read the Solo Meeple Unboxing – HERE
Official site – Mythic Games
BoardGameGeek page – HERE
In Pictures…


4 thoughts on “Time of Legends: Joan of Arc”