
“And I saw three foul spirits like frogs coming from the mouth of the dragon, from the mouth of the beast, and from the mouth of the false prophet. These are demonic spirits, performing signs, who go abroad to the kings of the whole world, to assemble them for battle on the great day of God the Almighty. And they assembled them at the place that in Hebrew is called Harmagedon.”
Extract from Revelation 16
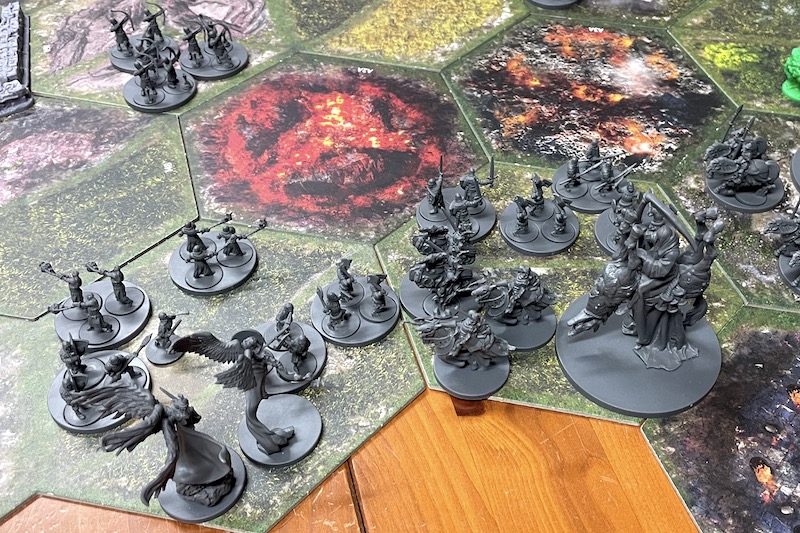
The ultimate battle between Good and Evil is the topic of this, my first, Battle Report. The game? Time of Legends: Joan of Arc.
I’d played this scenario through a couple of times against my daughter, who for her sins always gets to play the Unholy side. At the time, we couldn’t see how it was possible for Evil to win. She’d tried a couple of different strategies, but to no avail. After the games we sat down together and went through the rules, the cards, and BGG’s forums. We’d had a break of over a year from the game, so one could say we were a little rusty. It came down to the Beast, that huge, seven headed miniature that was the focus of the table; we’d got a simple rule wrong!
The rule was regarding its melee attack, and how, when it attacks, it can attack up to 3 adjacent areas. We had been playing it so that he made a single attack and the areas all defended against it, whereas each attack should be separate, and the Beast rolls to attack each one. Obvious once we’d read it in the forums, and I could immediately see the difference it would make. I think we had also underestimated how good the Gigantic attack could be and thought we should make more use of it. At this point, though, my daughter had had enough and so it was on my shoulders to prove that Evil could defeat Good, or at least give the Angels a few squeaky bum moments!
Setup
The Armageddon scenario is from the Apocalypse expansion and features the major players of Good and Evil, all referenced at some point in Biblical scripture.
Armageddon, according to some sources, means Mountain of Assembly, and is a reference to the assembly at Mount Sinai, and to its replacement, Mount Zion, I say this as in the scenario it is Mount Zion that the forces of Evil seek to overthrow.
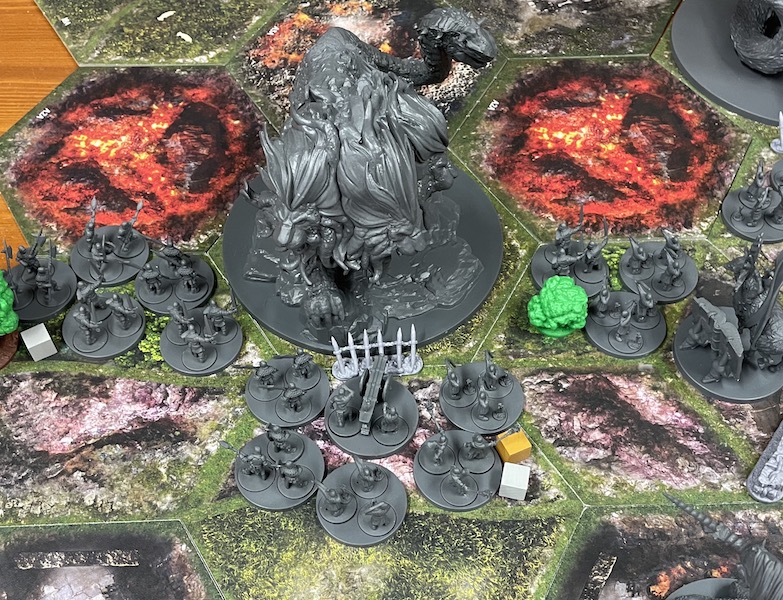
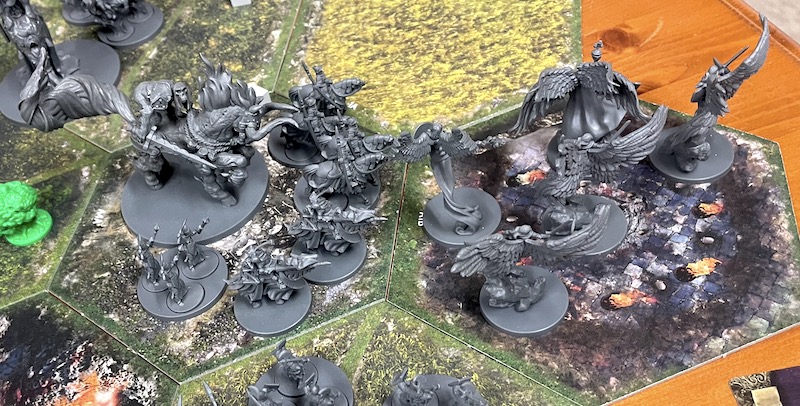
The battlefield is divided into three areas. One for the forces of Evil to setup in, a central area for the Human forces of Good, and then Mount Zion and the surrounding hills for the Non-Human forces of Good. The Unholy bunch score victory points for destroying the major players -The Lamb of God, The Archangels, The Ark of the Covenant, The Holy Relic, Judgement, or for occupying Mount Zion for a turn. Once six of these are achieved, they win, simples… But, as they chip away at the Goodies, more Goodies appear, as hopefully we shall see. There are no rally points for this scenario and so if a unit is disrupted it is immediately destroyed. One other thing worth mentioning here is that the game lasts eight rounds, the first four are at night meaning that the forces of good can only fire a maximum range of 1-area. The next four rounds are in daylight and the roles are then reversed.

I had the Holy side setup as I had in the previous games. The Human troops are crammed into the areas surrounding the hills. My hope here is to have the archers retreat to them, enabling them to fire at a greater range once daylight appears. Packing them tight gives me an advantage over enemy troops, as I can defend pretty well, however, it does leave them vulnerable to the gigantic creatures, The Beast and The Leviathan, which could break them, but in the past, they’ve held their own against the Leviathan. Spreading troops thin leaves them vulnerable to being rolled over, one after the other, by a larger force.
Joan of Arc is on the right wing, and I’ll use her command rating to move troops around there. She’s worth activating every turn because she automatically gains a reactivation token, so it’s like a free activation.
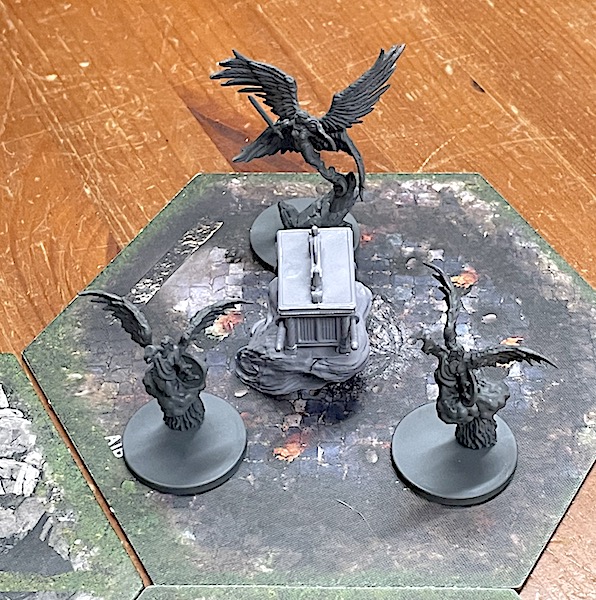
Judgment, the most powerful Holy character, is sitting on Mount Zion. It will be difficult for the powers of Evil to move him from there. Either side of him I have Triumph and The Griffin, both useful in attack and defence. The Lamb of God and a couple of Angels sit to the front of Zion and will bolster the troops when required. Behind the lines of troops, I also have a couple more Angels and The Holy Relic. The Relic isn’t a strong unit, having only defensive capabilities, but it does have a good command rating.
It’s important to guard the rear, as the Unholy side has plenty of fliers that could land and take advantage of a weak spot.
Setting up the Unholy side needed more thought. Unlike the Goody two-shoes, they wouldn’t be receiving any reinforcements, they also had to be mindful of the Lava areas, as any of their units receiving a push whilst adjacent to one is instantly destroyed, so they need to take the fight to their enemy, cutting through the first lines swiftly. They wanted to get to the Non-Human characters, the troops were just a hinderance!
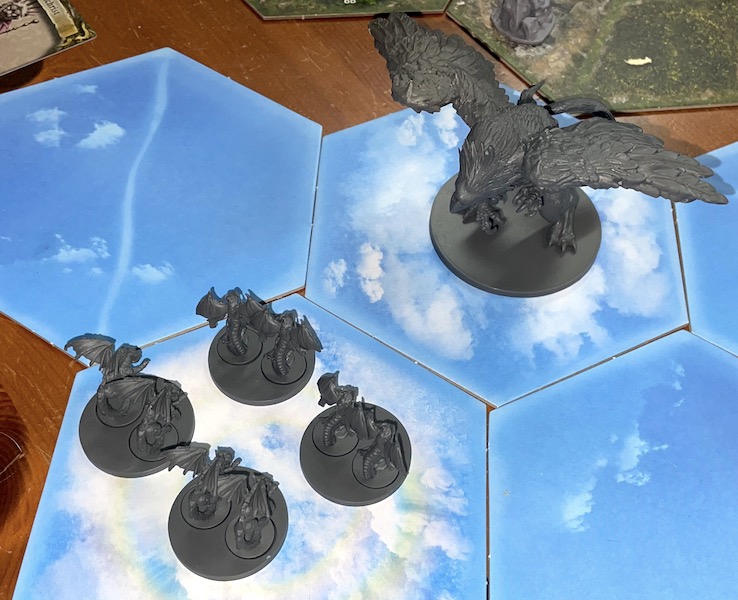
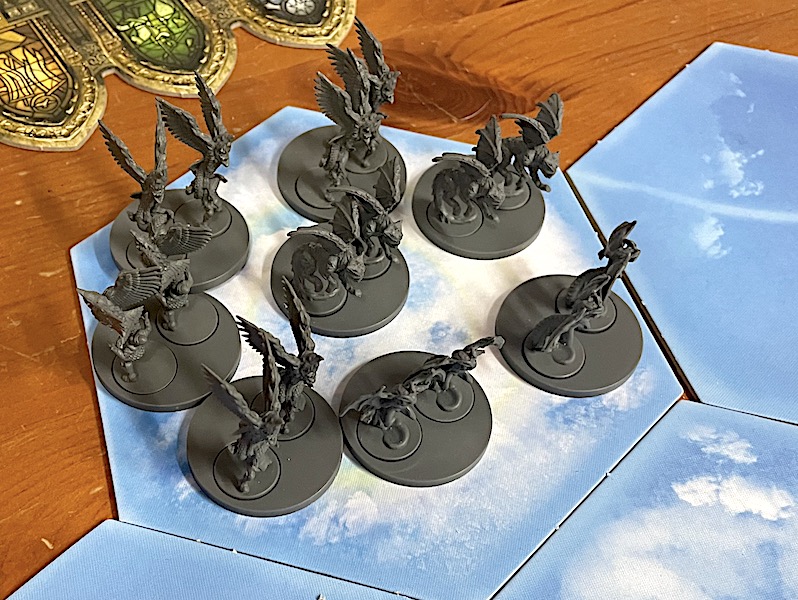
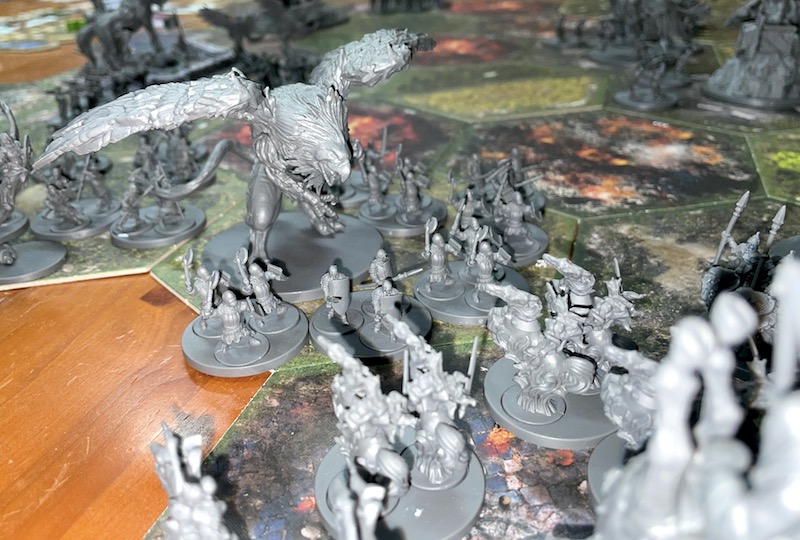
I decided on a plan of action and then placed the units in order to accomplish that plan. First up, I placed the Beast in the centre and the Leviathan on the right. I would use these to break through, and hopefully decimate, the lines of human troops. Along with these I had several units of cavalry and some infantry (plague bearers!), which would take advantage of any holes opening in the enemy’s defences – These would be led by Conquest. I also had a few flying units on standby – these could be deployed anywhere if needed.
On the left wing I had the main concentration of troops, cavalry and infantry, again backed up by several flying units. Amongst these were several reasonably powerful characters – War, Death (not as powerful as you’d expect!), the Grim Reaper, the Sabbath Witch, and the large Cockatrice.
Slap bang in the middle of all this was the Antichrist. Whilst he has no attack dice himself, other units do gain from his presence, and I’ll hold him until I know where he’d be best utilised. He also has a very good command rating, which might come in handy. He’s backed up by Famine, who’ll be kept in reserve.
I would only advance the left wing if things weren’t going well on the right or centre, or if an opportunity too good to miss arises. There’s a lot of fast-moving troops here and they’ll be able to whip around the rear if given a chance.

From here on in I’m not going to dive into the game mechanisms, just tell it a bit like a story. If I do feel I need to add something, then I’ll put it in italics and in parentheses. The Forces of Evil have the advantage of going first…
Round 1
The Beast storms forward, trampling the Human troops at the centre of the Holy line. Some flee before the great monster; others fall back in good order to reform in the hills.
Pressing its attack, the Beast strikes out in two different directions, totally obliterating a unit of Heavy foot soldiers, but also taking a few blows in return.

On the Unholy Right Wing, The Leviathan also plunged forward, trampling the units in front with its huge paws. Most units managed to scramble to the hills, but some bowmen and Sergeant-at-Arms were caught with nowhere to go and plunged into the Lava. The Leviathan advanced, taking up the position previously occupied by the Holy troops.

At this point, things didn’t look good to Judgement, as he sat astride his trusty steed. The Bowmen hadn’t had time to employ their stakes, or the Devotees to raise their barricades, and thus the creatures of Evil had been able to take advantage of his retreating line.
The Bowmen that had retreated to the hills before the Beasts onslaught began to return fire, though it proved ineffectual. They also got busy placing stakes before the great beast – for what good it may do. The foot-soldiers, which had previously fled from the Beast across the scorched earth, gathered their composure and retreated in good order, right under the nose of the enemies Cavalry.

Judgement signalled for an all-out attack on the Leviathan. A hail of arrows rained down, infantry overcame their fear, and battle was joined. All seemed for nothing though, as the mighty creature swatted away their every attack (Can’t believe it! I rolled over a dozen attack dice and did nothing at all!).
On the right, sensing the danger in the centre, Joan started to move some of her troops to the hills, hoping to cover any breakthrough by the Beast. She also sent a runner, who managed to reinvigorate some troops on the hard-pressed left and they attacked again, this time causing several wounds to the Leviathan.
(Not a great start for the Holy side and so different from earlier games. When I played against Yasmin, she never engaged with either of the two gigantic creatures in the first round, which gave me time to prepare defences by building barricades and placing spikes.)
Round 2
Continuing its rampage, the Beast struck out at the forces to its front, decimating the troops and leaving a solitary Standard bearer gallantly holding the line.

Judgement acts immediately, retreating the plucky bearer to the safety of his angels. He also commands some of his Bowmen, which were spread through the forest, to rain down arrows on the Leviathan, but they fail to pierce the monster’s tough hide. (Used an interrupt order to activate Judgement in order to use his command ability.)
Angered by this, the Leviathan roared and snapped, trying to kill and force its way through the lines. Fortunately, the troops stood fast and even managed to wound the horrific creature.
Pressure was mounting in front of Mount Zion. The Beast raised its mighty bulk and surged forward causing the Angels to scatter taking with them the unlucky standard bearer. The Unholy Beast now stood in front of the walls of Judgement’s stronghold, enemies to either side, what would be its next move? (Reactivation token to activate the Beast a second time.)

Behind the Beast, the Antichrist issues out orders – Flying Demons and Gargoyles thus take to the air. He then moves forward into the cemetery, maybe to raise the dead to do his bidding.
Joan, all too close to the action, has an intimidating view of the great Beast. She calls for her men to attack but some cower down with terror and cannot approach the monster. Her Bowmen, resolute as ever, launch a volley that strikes, but does little damage. Trying to use her powers of persuasion, she calls upon one of the Angels to strike at the thing, but even one so Holy is daunted by the horrific sight and refuses to obey. (The beast has Terror 2 and whether a unit attacks it or not depends upon the roll of a few dice.)
It is time for Judgement to act, and he plummets down from Mount Zion bringing his Angels, along with his rage, down on the Beast. Combat is bloody and fraught, but they deal their enemy a mighty blow. Still, it stood before them…
Breaking contact they start the climb back, but Judgement senses that this could be the critical moment. He turns and once more urges his magical stallion back into the fray. The Angles follow their leader, their screams of defiance can be heard across the battlefield.
It was a valiant attempt and indeed, it caused several major wounds to the gigantic creature, but it gave no quarter.
With the Leviathan currently held on the left, Judgment’s eye turned toward the flying creatures above them. He knew they were a threat and could come down anywhere on the field of battle, even behind his lines. The decision was made, and the Huge Griffin leapt into flight.
(The Beast is on its last legs, needing three more wounds to destroy it. The Leviathan is currently being held, but still the concern is the Holy centre. From the Evil forces point of view, they have broken the front lines and need to push through. They have units in the air that successfully provoked a reaction from the Holy side, leaving space at the rear of Mount Zion… will they take the opportunity or have they something else up their grubby sleeve?)
Round 3
(Only receiving two activations from the round cards and 1 from the War Council meant this was going to be a lean turn and demand some serious thought!)
After being dealt a severe blow from Judgement and his Angels, the Beast veered to its right, turning its attention to The Lamb of God. It gave no quarter and trampled the unfortunate thing under its massive bulk, taking with it 3 Units that were hiding in the forest. (The Unholy side scores its first Victory Points and triggers a wave of reinforcements for the causes of Good.)

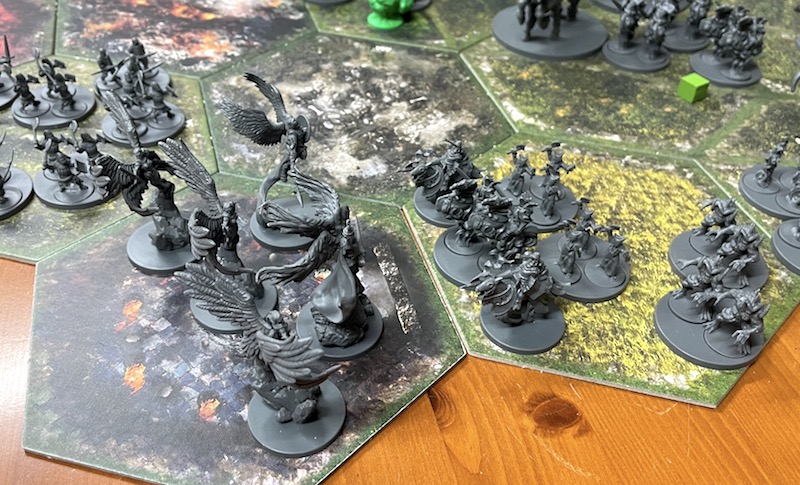
A bright light appears in the sky above the Unholy left flank and from it appears a beautiful sight. 3 Angels swoop down, behind them two Archangels, Raphael and Gabriel, wielding their mighty weapons ready to strike at the Evil before them.
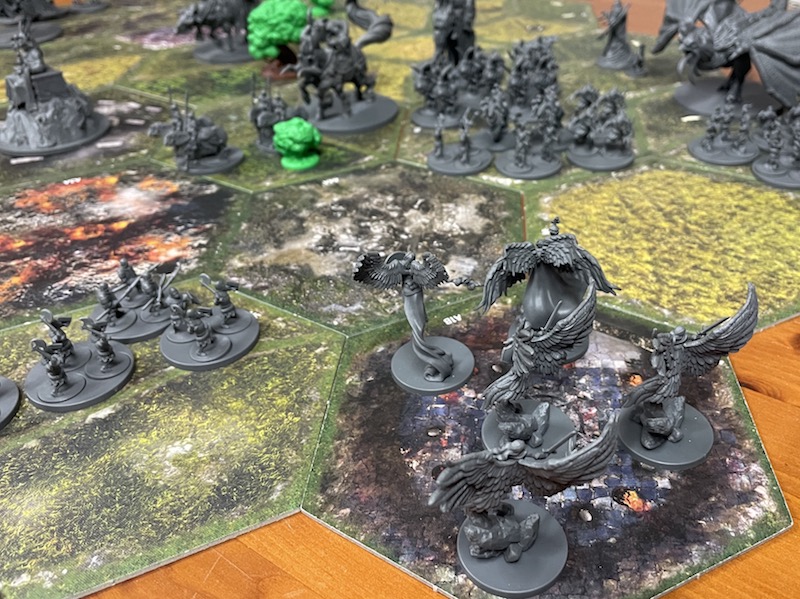
Meanwhile, filled with bloodlust and surrounded by enemies, the Beast strikes out in three directions. Using its claws, it tries to grab Triumph, one of its mightiest foes. It misses but manages to rake its flank and cause it to rear up on its hind legs. With three of its Heads the Beast snapped at the troops to its right. The troops hold fast, even managing to retaliate and land a few blows of their own. The Devotees, however, turn tail and run! With a lunge, its remaining heads strike out at Judgement and his Angels, but they are comfortably tucked away behind their defences and laugh at its feeble attempt.
Triumph advances on the Beast, trying to spear it with its long horn. It can see that it is on its last legs, but still, it puts up a formidable defence, and Triumph breaks away.
“We can’t let the Beast live. Forward!” And with that Judgement once again led his Angels in to attack.
The Beast, already reeling from its wounds, put up a valiant defence, but in the end Good prevailed and it slumped to the ground, vanquished. As Judgement turned back to climb the Mountain, he gave orders to his Angels to remain and protect the Hills. He also sent word to Joan of Arc, ordering her 3 units of Bowmen forward to protect the centre.

(An interesting round. The Beast has opened the centre, but there are no troops close enough to take advantage. Both sides have strong flanks, thought the Leviathan is now free to attack the central Angels and maybe the units behind him could attack the Holy left flank. The reinforcements have appeared in a dicey position for the Unholy side, and they’ll have to try and concentrate on bringing down the Archangels. The troops in the air are currently at an impasse, and the Unholy centre appears somewhat lacking. Both sides kept hold of a charge order, which may prove decisive later. On to round 4)
Round 4
The Leviathan, seeing the Beast defeated, moves in to seek revenge on the Angels, pushing them back as it advances. Continuing, it turns and strikes out at Triumph, wounding it as it stands fast.
The Antichrist sees that the Holy centre is in chaos, but has no units close enough to press the attack. So, he raises up a troop of Skeletons, made up of the dead bodies of soldiers past, buried in the cemetery where he now stands. From the right he commands his Plague bearers to advance on the centre, though they move so slowly. Conquest moves to Flank him, seeking orders perhaps, or just scheming?
The Leviathan’s flank is open to the troops it once harried. The Culverin Crew stare at the beast; frozen in fear they are unable to turn their weapon to bear. The others, though, raise their fists in anger and give the monster hell, scoring a few wounds in its side. Meanwhile, the Angels attack its other flank, or at least one does. The other can hold her nerve no longer and cowers back as her companion unleashes a storm of blows on the creature, all to no avail.

Judgement calls for Triumph to join him on the Mountain top and together they rush the Leviathan head on, hoping their combined forces can bring it down. It was a short, brutal clash, before they turned back to the safety of Zion. They left leaving the Leviathan bloody, but still standing. With a nod to his right, he spreads his troops out on the flank.


(Another short round. The Unholy side kept back two activation orders, a charge, and a reactivation, whilst the Holy side just retained a charge activation. Triumph joined Judgement before the attack as the Leviathan automatically shield two successful attack rolls and this way it increased the odds of doing some damage. The Holy left Flank has been cut off from the centre, fortunately, the enemy hasn’t been able to manoeuver troops quick enough to take advantage of this. They also have their own problems with the mounting threat to their left. In hindsight, assembling faster troops behind the two gigantic creatures at the start could have proved decisive!)
Round 5
Daylight spreads slowly across the battlefield and the forces of evil blink, knowing that the advantage of darkness is no longer theirs. (Daylight – The forces of good can now fire at their normal range.)
The Antichrist, sensing that time is running out and action is required, formulates a plan, and starts to bring it to fruition. He raises his hand, and another unit of Skeletons bursts forth from the ground. He signals again and this time a formation of Cavalry starts to advance on his right.
On the Left wing, War, always one to notice an opportunity, commanded the Voracious Demons towards the two Archangels. He then had a unit of Mounted Spectres fill the hole they’d left. Things were brewing for a storm…
War hefted his giant sword, paused, then brought it sweeping down. The Infantry and Cavalry charged!
The attack was fierce, but soon petered out. Both Archangels had received minor wounds but, as far as the Unholy side was concerned, the charge was a failure. As they broke contact the Angels counterattacked and, despite the intervention of the Voracious Demons, the Unholy formation was decimated, killing most, and scattering the remains.
Back on Mount Zion Judgement prepared to launch another assault on the Leviathan, and together with Triumph he spurred his mount into battle. Again and again, they struck at the enraged creature, but their blows seemed to do very little; they broke contact and returned to Zion to contemplate their next move.
(Both sides once again kept back activation orders: Reactivation and Charge for the Unholy, and 2 charge orders for Holy. The Leviathan doesn’t seem to be making any headway against Mount Zion, so maybe it’s time for a change in tactics. The Unholy left wing needs to press their attack against the Archangels too before they fly away out of reach. Things, I think, have swung back to the side of goodness!)
Round 6
The mighty Leviathan, having beat itself against the walls of Zion for long enough, swings to its right and careers into the men defending the path to The Holy Relic. It tore into them, it trampled them, it used its razor-sharp teeth and claws to disembowel them… it roared in its victory and advanced towards the startled Relic. (It didn’t quite wipe them all out in one shot and needed a reactivation token to finish them off.)

Seeing the Leviathan bearing down on them they did the sensible thing; they ran away! Taking to the skies, The Holy Relic and two Angels barely escaped, but were they jumping from the pot and into the fire? (The Holy side used an Interrupt order to make their escape.)
Sensing the balance of the battle, The Four Horsemen advance slowly, bringing with them a momentous feeling of doom… (An Intrigue was triggered advancing each Horseman one area.)
War now found himself in a position to concentrate his forces against the Archangels, and he wasted no time in doing so. Once assembled he led the attack himself. In a crash of steel, the combatants met. At first it looked as though the Angels would be overcome, but they held and pushed the forces of evil back, destroying a unit of Heretics, which made Raphael smile!
Not to be outdone by his compatriot, his fellow in arms, Death led his Mounted Spectres in their own charge against the weary Angels, though Death, being Death, and not so adept with a sword as War, stopped short of leading them in and watched from a distance. What he saw pleased him. The two Archangels, especially Raphael, were bloody and close to exhaustion; he smiled.
Clicking his fingers, two units of Damned joined him from under War’s command. This time Death himself led in the attack that he hoped would bring him at least satisfaction, if not glory!

Satisfaction was something, he supposed, but Glory would have been nice. He shrugged and turned away to regroup. Three Angels had been vanquished but, despite their wounds, the two Archangels survived… Just!
(The Unholy side committed everything they had to attacking the two Archangels after The Relic had taken to the skies. Maybe they should have chased it down, but the lure of two objectives in one place proved too much!)
Raphael and Gabriel beat a retreat, with a beat of their wings the jumped to bury themselves deep within a formation of infantry. They considered themselves safe… for now!

Also heading for safety, The Holy Relic and its protecting Angels touched down behind the lines, seeking the protection of Judgement and Triumph, who stood in the path of the Leviathan.
The Griffin also touched down, but this wasn’t a creature content to sit at the back of the lines and it landed at the head of the troops to stand in defiance of War and Death.

(With that the Holy side was happy to sit back and save their remaining two charge activations. They had pulled the important units away from harm and the forces of Evil would have to spend several activations in order to get to them, hopefully…!)
Round 7
It was time for desperate measures, and so the order went out for the Devourers to join their comrades in the air. Once airborne, they all gathered together and launched what they hoped would be a devastating missile attack against The Holy Relic.
Missiles rained down, the Angels spread their wings in defence of The Relic, hoping to shield it. Indeed, devastating it was. The Angels fell first, weeping as they died. Then The Holy Relic collapsed to the ground, turning to dust as it fell. The moment could be felt across the battlefield: Elation for the Unholy troops, despair for the forces of Good.
And yet all was not lost, as the sound of horns echoed across the hills. The Ark of the Covenant had arrived, and the troops were filled with joy… or at least a little less despair. It wasn’t alone either, for three Angels came alongside, two were Destructive Angels blowing their horns as they came.
Death could see his enemies across the battlefield, surround by a press of troops. Time was of the essence now and so he threw all caution to the wind and pushed his forces forward, determined to cut through to his objectives.
Unfortunately for Death, that meant trying to force his way past the Griffin, a huge bird like creature with a sharp beak and claws. His forces made short work of the infantry, cutting through them with ease whilst Death tangled with the formidable creature. It was a ferocious fight that left the Griffin barley standing, and in the end, Death was forced to break contact and regroup. If only they had more time, he thought, then victory would be theirs… just a matter of time!
Judgement cast an eye over the battlefield. His left wing had been decimated, barely a handful of troops survived; The Leviathan was master there. His centre was also shattered, but he felt he had enough still standing to hold Mount Zion, especially as he had Triumph at his side. The right wing, though, looked strong, despite the recent setback he had witnessed. He had numerous forces there as well as the two Archangels; they just needed to hold. It was from the sky he saw the most danger, as he had seen how they had cut down The Holy Relic and its guardian Angels.
Yes, the skies held the danger. If the enemy forces were to swoop down and destroy the Arc, as they had done The Relic, then the troops would lose hope. He now lacked the bowmen to bring the aggressors down. He also lacked flying units. The Griffin couldn’t leave its post defending the Archangels. The Archangels themselves were already battered and bruised; their loss would be equally devastating.
He turned to Triumph, “You will hold Mount Zion. I will send reinforcements. Do not be drawn away.” And with that, he took to the skies himself.
He commanded the Angels, who up until now had guarded the centre, to join him and they spread their wing in obedience. Once airborne, they all ploughed into the enemy’s forces and a great air-battle ensued. Outnumbered, Judgement was hard pressed, but he himself brought down two units of Gargoyles whilst the Angels fended off any counterattack. After some time, they parted and faced each other across the skies, waiting to see who would make the next move.

Joan of Arc climbed the hills to Join Triumph, bringing with her two small units of Heretics and Penitents. They were weak forces, but better than nothing.
Judgement saw the banner that Joan hoisted, a signal she had joined Triumph, and with a sigh, he joined battle once more. (Activating Joan gave the Holy army a reactivation order, and so Judgement was able to attack once again)
This time, though, the enemy were ready, and they kept a wary eye on Judgment’s movement, avoiding his sword and harassing the Angels. In the end they all survived, thought they’d been scattered across the skies.
As the battle raged, the few remaining Bowmen kept an eye out for an opportunity. As the Evil forces scattered the Bowmen loosed and for their reward, they brought down some Demons and Devourers; the odds had been reduced!
Meanwhile, the two Archangels were busy preparing the defence of the right wing by moving troops around, healing, and spreading the word of hope. This gave the Bowmen the inspiration and energy they needed to loose again (using the reactivation order gained through Raphael). This time they aimed at a larger group and once again their aim was true, bringing down more Devourers and scattering the rest – the odds were well and truly in favour of Judgment and his Angels now.
(That was the decisive round. The Unholy side threw everything they had into that one and didn’t quite achieve their goals. The air attack on the Relic was great, but unfortunately, they lacked a reactivation order, otherwise they may have wiped out the Arc or even the Archangels too. But, now that Judgement, the Angels, and of course the Bowmen have had their say, things are looking quite different. Things could also have been different if they’d manage to overcome the stout Griffin, which was the only thing standing between them and the Archangels. If they’d brought that down and followed on, they could have attacked them, even defeated them. If they had managed all of that then all they would have needed was one more objective in the last round, unfortunately they didn’t, and so all they need now is a miracle, but I guess they’re on the wrong side for that!)
Round 8
Despite the troops sent in to bolster the Griffins position, when Death attacked with his monstrous cavalry there was nothing they could do. Death wiped them away with his Scythe, as if he were reaping the harvest. He didn’t come away untouched though, as the Griffin managed to gouge him with a last effort before it died.
Death commanded his troops forward, right into the heart of the enemy’s wing – The Archangels beckoned!
Death, this time, was at the front of the line and made straight for Raphael and Gabriel. His troops followed, ignoring the Foot Knights that tried to defend their leaders. Great blows were landed and the two Angels severely blooded, so too was Death. They broke contact, but only for a moment as Death and his Cavalry regained their formation and charged in once again (Reactivation order!).
The Angels were now too weary to offer any semblance of defence and they fell to the onslaught. The Foot knights were then left alone, but only for a moment as they too were wiped from existence. Death halted his remaining forces, as he too had lost troops, thought he cared not. He had achieved his objective and would not be held responsible if the battle were now lost – he smiled to himself, as he sat and stared at Mount Zion.
At the rear of the Unholy forces there stood a beast, an odd-looking thing that could only ever be something Evil… The Cockatrice. So far it had stood, all alone, watching the battle unfold. Now was its moment and at the command it took to the skies to join the other, now regrouped aerial units.

It was the Antichrist’s last final effort, to throw as much firepower down on Mount Zion as he could muster in the hope they could at least kill Triumph, thought the battle would still be lost, as the sun was now high in the sky and his power waned.
The attack went in, down they dived unleashing missile after missile, but that’s exactly what they were, ‘miss-iles!’ The Holy forces were too well protected and at no point did they look vulnerable. The Cockatrice screeched, frustrated that it had been unable to kill and feast on the dead bodies of its foes.
The Antichrist showed little emotion. He waved his hand in the air, and as one, all his troops turned tail and marched from the battlefield. The Unholy commander stayed for a little while longer and stared up at the circling figure of Judgement. He nodded. Judgement responded in kind. They both knew that this wasn’t the end, that they’d meet again at another Armageddon. He turned and followed his troops. As an Immortal he knew they’d play this game again, just as they had before, and maybe, just maybe, one day he’d win!
And that was the battle of Armageddon!
Well, if you’re still reading thanks for sticking with it and I hope you enjoyed it as much as I did. In the end it was a close-run thing, and throughout the game I kept changing my mind on who was going to win, as it swung back and fore. If the Unholy side had had a few more order tokens at the end, then I’d have moved the Leviathan in to attack Zion instead of the aerial units. Or, I could have had the Sabbath Witch joint them, as that would have increased the firepower. Using the Cockatrice was all I could think of with what I’d got to work with, as it had targeting and any successful hits could have been placed on Triumph, perhaps killing him. Unfortunately, the dice rolling went askew!
In the end, I think the scenario is well balanced. When we played it previously, we were too rusty regarding the rules and all the units special actions and were especially naïve regarding how to use flying units. Two skilled players would get a lot from this scenario, and I hope to revisit it again, though you know what this game is like to set-up, so don’t hold your breath!
So, that’s it. Armageddon in a nutshell, thanks for reading.

Great report Justin, lots of twists and turns along the way. There are some great looking models in the game as well.
LikeLiked by 3 people
Thanks Dave.
Yeah, it has some lovely minis, even the 15mm, which make up the majority, are well detailed… I might get around to painting them one day!
LikeLiked by 2 people
That game has some awesome figures! Thanks for taking the time to write this battle report, it’s really interesting and as Dave said, provided plenty of back-and-forth twists and turns.
LikeLiked by 3 people
Yep, some nice minis. The four Horsemen of the Apocalypse are particularly interesting, even if Death is somewhat obscure!
The game often produces many to and from moments, which are caused by the limited and variable activations. The way movement works introduces a strategic depth to the game, as the number of troops an area can hold is dependent on its size – 8 in a whole Hex, 6 in half, and 4 in a third – this can also swing the game as you suddenly realise you can’t quite do what you intended!
LikeLiked by 2 people
Wow, great report, anything afterwards must be an anti-climax!
LikeLiked by 2 people
Lol! Thanks mate.
There’s not a lot that can match fighting for the end of the world!
LikeLiked by 1 person
This is an excellent write-up! It was tense throughout and the minis look great. Are you planning on painting them up and how long did this game take? It seemed like it could be an epic 2-3 hours to me as a reader.
LikeLiked by 4 people
Thanks Jeff.
Yes, the game would normally take about 2-3 hours. This one took about twice that, as I was writing it up and taking pictures as I went.
Unfortunately, it also took about 2-3 hours to set up and another hour to put away, so it doesn’t come out very often. This is the main reason I’ve held off painting the minis. I’d rather concentrate on games that get to the table more often. Saying that, though, it would look awesome if they were all painted and there are some, such as the Beast and Leviathan, that would look great in a few other games I have planned.
LikeLiked by 2 people
That makes sense to me. There are a lot of minis to paint and base for this game too so I totally get that. I’ve barely dipped my toe into board gaming and I feel like I’m already calculating which games can I play without adding too much to my backlog so I can relate 🙂
LikeLiked by 1 person
Definitely give this one a miss then, as there are around 260 minis in the base and I think I’m in at around 600+ with the expansions!
LikeLiked by 2 people
600 minis!?!?!?! That is so insane. Only the Warhammers have that many different many sculpts to choose from I would think. I’m going to give this one a wide berth at it would literally take me years to get all those painted at my pace! 🙂
LikeLiked by 1 person
I’m thinking decades, I mean, I’ve had the game over two years now and they haven’t even been seen in the same room as a paint pot!😔
LikeLiked by 1 person
At a certain point, you have to do the mental math and try to decide if they’re worth the time to paint that you’d have to invest. I would say leave ’em as is and focus on smaller projects where you’ll get more usage out of what you paint.
LikeLiked by 1 person
Yep, that’s the conclusion I came to, though there are a few that I have my eye on painting, mostly the larger and more interesting ones – want to have a crack at the Beast at some point!
LikeLiked by 1 person
Cripes! Plenty going on there and no pauses to catch your breath! Really enjoyed reading this, Justin, so thanks for posting! 🙂 I can see how the minis would look good painted, but there are a lot of them!
LikeLiked by 2 people
Thanks John, and yes, there are a lot of them. What you can see here is a fraction of what comes in the game, especially with all the expansions I have. So, I’m a bit reluctant to start painting them, as I’d be there forever!
LikeLiked by 1 person