
The battle had been raging for some time. My left wing has crumbled away, defeated by cavalry charges too heavy for my peasants to withstand. My centre is strong though, and my right looks as though it will carry the day.
I notice my foe has started gathering his archers to my front, I feel a wound to my arm as another hail of arrows enters the sky. I feel weak, to many have found their mark, I must reassess my options…
…I draw cards for the start of the next turn, me to play first. I have it, ‘Saxon Determination’, Remove all damage from 1 Saxon Unit or Character. I flourish the card in front of my opponents nose with a gleeful look on my face, and simultaneously swipe all the accumulated damage from my leader; surely this battle is now mine to win?
- Designer: Tristan Hall
- Publisher: Hall or Nothing Productions
- Year Released: 2018
- Players: 1-2
- Playing Times: 30-40 minutes
- Ages: 12+
- Recommended Retail Price: £30.99
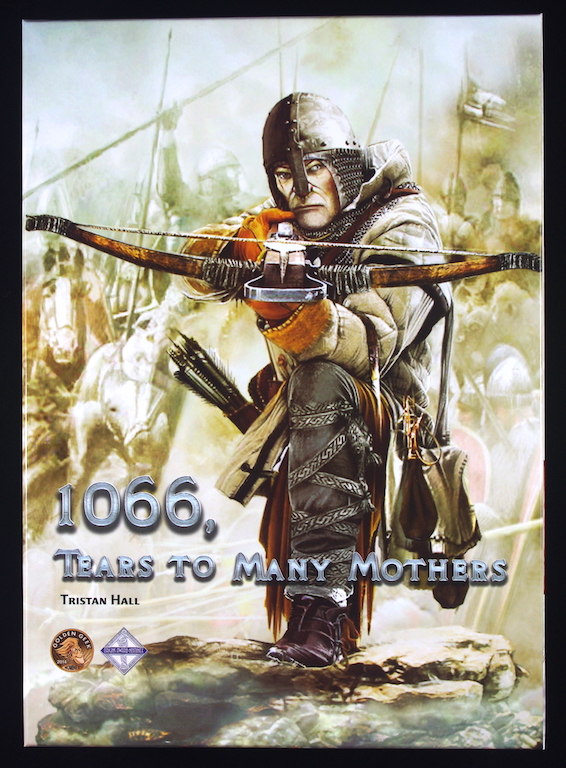
1066, Tears to Many Mothers, is a competitive two-player card game, which sees opponents vying for victory at the Battle of Hastings. With beautiful artwork and historic flavour text, is this a game for conquering heroes? Or does it fall from its horse during the first cavalry charge?
What’s in the box?
- 173 Cards, plus 3 bonus promo cards for Gloom of Kilforth
- 80 Wooden teardrop tokens – 40 red, 40 blue
- 22 Cardboard tokens – 11 +1 Zeal, 11 +1 Might
- 1 First player token
- 2 Rulebooks

The cards are standard size, in terms of sleeping, and have a glossy finish. They have a good feel to them, not too thin to be flimsy, and overall are of good quality.
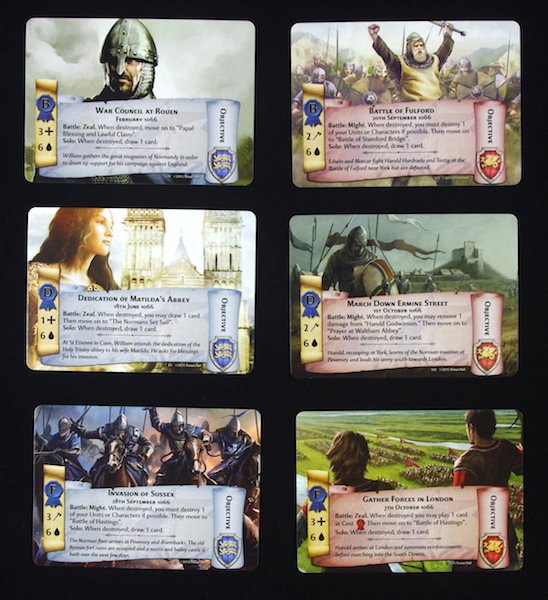
The art on the cards is excellent, portraying the many characters and soldiers of the battle very thematically. The attention to detail, especially the facial expressions, draws the eye in to the image.
All the cards are easy to read, though the font used for the flavour text may be a little small for some.
The wooden tears shaped tokens are really nice addition, and they’re just the right size to grab hold of, but not too large to become a hindrance. There are more than enough provided for gameplay.
The cardboard tokens are pretty standard affair. They are very plain to look in contrast to the rest of the game, but clearly indicate what they represent – +1 Zeal, or +1 Might. Some of the corners of the tokens were already starting to delaminate when removed from their board, but as they are only lightly used throughout the game, this is unlikely to become an issue.
There is a first player token, and as with the other tokens, it is made from high-density grey-board. It features a nice image, which in contrast to the card artwork, is toned down in colour.
Two A4 rulebooks are contained within, and the main rulebook features the same image as the box on its cover. The print is large and very easy to read, and there are a few picture examples where needed. On the whole the rules are easy to follow and should get you up and playing in very little time.
The solo rulebook is likewise as easy to read and comprehend, though you will need to go through the main rulebook before playing the game solo.
The box is on the large size for its contents, obviously with though to contain any up and coming expansions. It is a good sturdy box and the cover artwork is probably some of the best to grace a board game box. Contained within is a simple cardboard inlay, which holds everything within the centre of the box.
How does it play?
If you’re familiar with how the game plays, then feel free to charge on down to ‘So, what do I think?’
The object of the game is simply to defeat your opponent! You can achieve this in a number ways – Destroy two of the three wedges, basically a wedge represents a column of the enemy troops; Destroy your opponents leader by dealing 9 damage to him; Have your opponent run out of cards in their draw deck.
Each player selects which side they will represent, Norman or Saxon, and gathers the relevant deck of cards along with their objective deck and associated wooden tokens.
There are several different types of card contained within a deck – Units (Archer, Infantry, and Cavalry), Characters, Leaders (William and Harold), Events (one use cards), Tactics (placed in a the players reserve area), and Attachments (attached to cards in play, usually to provide a bonus to Might or Zeal).

The cards are clearly marked with various attributes – Card cost, Zeal, Might, Health, Number of resources generated (if any), and abilities.
The game is setup by placing the three wedges across the centre of the table, numbered 1 to 3 as viewed by the Norman player. The Norman player then places his leader in the first row of one of the wedges. The Saxon player then places his leader likewise, in the first row of any wedge. There is a good example of this in the rulebook, see below.

Players then arrange their set of objectives in alphabetical order, A on top.
They shuffle their respective decks and draw a hand of 4 cards. They may, at this point, choose to discard their hand and draw a new one.
The gameplay is a fairly simple process to follow, and is broken down into 4 phases – Preparation, Deployment, Wedge, and Objective.
In the Preparation phase, if one player’s deck is empty, then their opponent wins the game; it is a tie if both players’ decks are empty. Otherwise, both players must discard down to 6 cards in their hand, and then draw 2 from their deck. They then ready all previously tired cards on the battlefield.
There is an advanced drafting variant, seeing the players draw 3 cards to their hand, but then discarding 1. I would advise playing with this variant, it enables you tailor your choices for the turn.
Tired cards are those that have used their action, been used to generate resources, or been forced to tire by the opponent. Tired cards are rotated 90 degrees.
The Deployment phase is where all the action takes place, and starts with the player holding the ‘first player marker’. Play passes from player to player until on player passes, then the other continues until they too pass. There are a number of options a player can choose from: they can – play a card, use a cards action, sacrifice a card, or pass.
To play a card from their hand, the player must meet its cost in resources. To generate resources a player can tire a card to gain its indicated number of resources, and/or, discard cards from their hand, each discarded card is worth one resource.
Cards played directly to the battlefield, Units and Characters, must be placed on that players side of the battlefield, in any wedge, in the lowest unfilled row. There can be no gaps – i.e. If there is a card in row 1, but no card in row 2, then the played card must go in row 2, it cannot be played into row 3 of that wedge. Likewise, if a card is destroyed in row 1 or 2 of a wedge, all cards in that wedge that were behind it, move forward to fill the gap.
Other cards that may be played include Tactics, which are played to the players reserved area, Attachments, which are attached to another of that players cards or a wedge, and Event cards, in which case the player carries out the action on the card and then places it in their discard pile.
A player may wish to sacrifice a card. A reason for this could be that the player wishes to play a more powerful card into that wedge. The player simply removes a card from their side of the battlefield to the discard pile, moving any other cards forward to fill the gap.
If a player chooses to pass they take the first player marker and their opponent is then free to carry out any further deployment actions they wish, until they too pass.
The Wedge phase is only conducted if either of the players is at the Battle of Hastings objective. If both players are at this objective then both Might and Zeal combat steps are carried out. If only one player has reached that far then just a Zeal combat step is carried out.
During Might combat each side totals up the Might of all their ready cards, wedge by wedge, and the side with the highest value in each wedge, deals damage to that wedge, to the value of the difference between the Might of the two sides. If the Might values are tied, then both sides deal a 1 damage to that wedge.
For example: In wedge 1, the Normans have a total of 3 Might, and the Saxons 5 Might. The Saxons would place 2 red Tear tokens on that wedge (5 Might – 3 Might).
Zeal combat is carried out in a similar manner, but adding up the Zeal of all ready cards wedge by wedge. If one player has a greater Zeal in a wedge, then they deal 1 damage to that wedge. If both players are tied, but greater than 0, then both players deal one damage to that wedge. If both have 0 Zeal, then no damage is dealt to that wedge. If a player is not at their Battle of Hastings objective, then they cannot cause damage during this phase to a wedge. They can however, by having a greater Zeal in a wedge, stop their opponent from dealing damage to that wedge.
The first player to deal 10 damage to a wedge claims that wedge, removing it from the battlefield. No more wedge battles will occur at that wedge, however, all other play continues as though it were still present on the battlefield.
Finally, there is the objective phase. The objective card indicates which attribute is to be used to advance the objective, either Might or Zeal. The required attribute is totalled of all ready cards under that players control on the battlefield. This total is compared to the value given on the objective card, and damage dealt to the card equal to the amount it exceeds this value. Once an objective has received damage equal to, or exceeding its health, then it is destroyed and the player moves onto the next one.
Play continues until one player is defeated
So, what do I think?
Ok, let me start by saying that this is a game of two beasts – one, the player vs. player game, and the other, the solo offering. I’ll talk about the solo side a little later, but first, let’s see what I think about the components…
I’ve harped on about the artwork in previous posts, but it’s worth a further mention here. I love the box art – stand it on a shelf in full view and when anyone enters the room their eyes are drawn to it. It makes you feel like the crossbowman is sizing you up – is he going to pull the trigger? The look of grim determination on his face says it all!
The original artist, Ania Kryczkowska, left the project early on, which was such a shame. Looking through the cards I could probably take a reasonable guess at which cards were her work. Though pretty much all of the art is of extremely good quality, there are several cards that really stand out – there facial features are greatly defined, you can see their feelings written across the lines on their face, this truly is emotional art at its best.

The other great thing I liked about the cards was all the flavour text. I think I learned more about events surrounding the Battle of Hastings through these cards than I ever did at school. My first few play-throughs took an age, as I read every single card I came across, clearly a lot of research was put into this side of the game.
What I didn’t like about the cards was the little red rosettes. Some cards give a bonus through the ability to play a card at a reduced cost. This cost is presented in the text by black writing on a small, very small, red rosette. I found it extremely difficult to read these, and if the card was in play on the table, I had to pick it up and squint at it to see its value. It really should have just had the number printed and the rosette done away with.

I always like wooden pieces in games, I think they shout that little bit of quality and attention to detail. These are no exception being of a really nice size and weight, however, I did find the shape a bit annoying at times. I understand why they are tear shaped, it’s in the title after all, but there were several occasions when they pinged off the table as I tried to grab hold of them, or they ended up being chased across the cards as they kept sliding from my fingers – it did lead to a few comical moments though!

The card tokens are okay. They could have been spruced up a little with some artwork, but to be honest, for how much they’re used, they’re fine as they are. Plus, they readily indicate what they are.
It would have been nice if they had a -1 on their reverse, as there are a number of occasions when this would be a benefit.
Okay, now on to the game itself.
I’ve been at odds with how to put this into words. It’s a game that is easy to play, the structure of the gameplay is easy to learn – draw cards, play cards, defeat objectives, overcome your opponent – and yet it is a difficult game to play!
To make a bit more sense of that, let me explain. If you pick up the game with no preconceived ideas about it, and go straight into a two-player game, the chances are, you’ll be putting it away again after the first play through.
After reading the rules the chances are you’ll play very reservedly, looking to play cards that generate resources, holding on to cards you deem to be powerful and useful. The game will drag, you’ll double check the rules to see if you’ve missed something, and end the game with a feeling of serious disappointment.
The reason for this is simple, and it’s a mistake easily made by anyone who hasn’t watched a decent play through, or read some of the comments on BGG. I know, I made the same mistake, though in my defence I always play my first games without looking at play-throughs, that way I get no preconceived ideas, and I learn the game from the rules, thus, if the rules are good, I don’t need to consult anything else.
Now in this case, it isn’t really the rules that are at fault, though there have been several occasions when I’ve had to consult BGG for some card clarifications. It comes down to an understanding of how the game plays, strategically, and how to get the best out of it.
This is a game that you have to work hard at, and it really gets the grey matter ticking over. Relying on playing cards to generate resources, and backing this up by discarding the odd card here or there, isn’t going to prove very fruitful. You have to be aggressive from the start, either throwing away those powerful, high cost cards, to get you going with lots of lower cost ones, or alternatively, throwing away most of your hand to play a single high cost card.
This offers up a great deal of differing strategies, but it also lends itself to a fair bit of analysis paralysis, trying to work out which cards to sacrifice from your hand to best effect.
There is also a great deal of frustration to contend with, mainly caused by two specific instances. Firstly, you can plan ahead, working hard to gather enough resources to play a card costing 5, the most costly of the cards, only to have it wiped away immediately by your opponent playing a card that costs a measly single resource. It wouldn’t be too bad, but this happens all to frequently.
Secondly, you have been working tirelessly, round after round, bringing the health of your opponents leader down to zero, and only need one more hit to kill him and win the game. Only he then pulls out a card, again costing a lowly 1 or 2 resources, which removes all damage from a character, and hence your leader. It’s a ‘take that’ mechanism, which you’ll love or hate, but sometimes it really makes you feel like taking someone’s eye out!
That said, is it a bad game? My answer would be no, but only if you’re prepared to work at it. Knowing that there are cards available to both sides, which can turn the tide on a sixpence, is something you have to bear in mind all the time when you’re deciding on what to play. It’s a fine balance between going for a quick charge through the objectives, and building up a basis of cards upon which to expand.
The objectives are the key to the game, and being first to Hastings isn’t always the best strategy. Getting there quickly might net you a few points of Zeal damage, but if you’re weak in Might, then when your opponent gets there, you may find yourself at a distinct disadvantage.
I do like the asymmetrical play, especially of the objectives, but the balance of the game takes some getting used to. For two experienced players I would say the game is fairly evenly balanced, though for someone looking in they may be inclined to think that Harold is a stronger bet, and I would certainly advise new players to start with him. William, at least to me, was more difficult to play; though once I’d got the hang of his decks intricacies then I much preferred playing him.
William is a slow starter, whereas Harold leaps from the blocks and can quickly charge through his objectives. Harold does have some negative affects dealt to him when completing the first couple of objectives, but they’re not enough to cause a severe blow.
On the whole I did enjoy playing the two-player game. There are lots of things to consider when strategising, and just deciding in which wedge to place a unit requires some thought. I did find the power to cost of the cards a little frustrating, and could see this turning some people away. I really liked the fact that you are never completely out of the game, no matter how far behind on the objectives you may be. You can hold an opponent at Hastings for a good length of time before he causes irreparable damage, and there’s always the chance to take the leader out too. And then there is the other beast to consider… Solo!
Can I play it… all on my own?
What a difference ditching the other player, and opening the solo rulebook makes!
For me, this was a much more satisfactory way of playing the game. Almost in an instance, the frustrations of playing the two player version were wiped away; you can strategise a little further ahead, as your AI opponent doesn’t keep taking out your best cards as soon as you play them, and this makes quite a difference to the game.
There are a few differences in the game play too…
You choose your deck, William or Harold, and the other side then becomes known as the ‘Foe’. The Foe deploys three cards at the start, as laid down in the rules, with the leader being placed in Wedge two, row three. When a Foes card gets removed, other cards in that wedge do not move forward to fill any gaps.
The turn passes back and fore, as in the two player game, and on the Foes turn, if they have any ranged units, then one of these will attack (unless at the Battle of Hastings, when they will only attack if losing the mite battle), otherwise they will draw cards from their deck until a card is drawn that costs less or equal to their current resources – this is equal to any resource cards they have in play plus a number of resources as indicated on a resource grid. The resource grid is divided into three difficulty levels, and the number of resources the Foe gains gradually increases round by round.

There are a few other changes; the solo action available on some of the cards now comes into play, and how some of the card abilities work are different, with many being ignored altogether. Again, there was the odd occasion where I found myself consulting BGG for clarification on a few things.
I found the solo game to be quite addictive once I’d got going, and it does lead to a faster paced game than the two-player version. There is a strategy that lends itself to beating the Foe pretty much every game, by taking out their leader, but the game is about much more than that.
The solo game is all about hitting that high score, 63 being the highest possible (28 for damage to wedges, 5 for a victory, and 30 for killing the leader – which ends the game), and it’s here that the game comes alive. You have to set yourself up to be able to take out the Foe’s leader, but hold back until you’ve mauled the wedges, and this is no mean feat. The way the Foe plays its turn works really well, and you’ll find yourself under constant pressure as more and more enemy units and characters come into play.
Lower cost cards get replaced as more powerful ones turn up, and you have to try and hold back the barrage of their increasing level of zeal and mite. It really does present a pretty puzzle.
I liked the fact that a lot of the cards have a specific action when played solo, though there were one or two others I felt could have done with this, as they were practically useless when drawn by the Foe – ‘Ship Patrols… Draw 2 cards,’ being one of them.
Played on the hard level the game really offers a challenge, and as I chased for a new high score I repeatedly found myself having to finish the leader off early to snatch victory from the jaws of defeat!
Recommended?
I would have to say that this is one to try before you buy. You really have to work at the two-player game, especially when first learning its intricacies, and the frustrations of seeing your hard work come undone in a single stroke could put many off.
However, there is a good strategic game here, one that has its feet firmly planted in an historic setting that is atmospherically portrayed by the artwork and flavour text. It’s a game that will lead to a fair amount of repetitive play due to its nature of producing close run games – you’ll always be wanting a re-match to get your revenge! I found it does play on the longer side of the advertised game time, with most of our games lasting around an hour, but it does have a very quick set up and put away time, mere minutes, which does influence your decision to have another go.
The solo game, for me, is the star of the show. A game plays in around 40 minutes, and it’s 40 minutes of brain draining decision-making. Replayability may come into question once you start hitting the really high scores, as unlike many pure solitaire games there just isn’t enough variance in game play to keep you at it for days on end.
So, a competitive two player game that, if you can overcome its frustrating ‘take that’ mechanism, will keep you and a friend entertained for many an hour. And, if you should find yourself alone, it has a very respectful solo mode to keep you reliving the historic battle of Hasting.
Extras
Official Site – Hall or Nothing Publications
Recommended Video Review – Gaming Rules
BoardGameGeek Page – HERE

2 thoughts on “1066, Tears to Many Mothers”